It is 11:45 PM on a Tuesday, and the house is finally quiet. The dishwasher has finished its cycle, the lights are dimmed, and the only thing I want is these crispy ghost meringue cookies with chocolate chip eyes. Honestly, I didn’t plan to bake at this hour. But the craving hit me with the force of a sudden thunderstorm, the kind that makes you abandon all sense of reasonable sleep schedules. You know how it goes—sometimes the soul just demands sugar, specifically the kind that shatters when you bite into it.
I pulled the baking sheets from the oven, careful not to burn my fingers on the hot metal. The kitchen smelled like toasted sugar and vanilla, a scent that feels like a warm hug on a chilly autumn night. These little white ghosts sat there, looking deceptively simple. They weren’t fancy like the perfect black and gold macarons I make for parties, which require a steady hand and a lot of patience. No, these were different. They were playful, a bit mischievous, and incredibly satisfying to eat straight out of the jar.
There is something deeply comforting about making meringue when you are alone. It is a slow process. You whip egg whites until they form stiff peaks, fold in sugar, and then wait. And wait. The oven stays on at a low temperature for hours, turning stiff clouds into crisp, airy shells. It teaches you patience in a way that most modern cooking doesn’t. You can’t rush it. You can’t force it. You just have to trust the process.
As I decorated them with tiny chocolate chips for eyes, I realized this wasn’t just about Halloween. It was about finding joy in the small, quiet moments. These cookies are delicate, almost fragile, but they hold their shape perfectly. They are a reminder that sometimes the simplest things—the most basic ingredients—can create the most memorable experiences. And honestly, eating one while the house sleeps feels like a little secret rebellion.
Why You’ll Love This Recipe
Let’s be real for a second. Meringue gets a bad rap sometimes. People think it’s finicky or hard to get right. But once you nail this method, you’ll wonder why you ever doubted it. This recipe is my go-to for when I want to impress without spending hours in the kitchen. It’s not just another cookie; it’s a textural masterpiece. Here is why these crispy ghost meringue cookies with chocolate chip eyes have taken over my baking routine:
- Quick & Easy Prep: The actual hands-on time is less than 20 minutes. You whip, you fold, you pipe. The rest is just waiting in the oven. It’s perfect for those busy weeknights when you want something homemade but don’t have all day.
- Simple Ingredients: You likely have everything you need right now. Egg whites, sugar, vanilla, and chocolate chips. No fancy flours or obscure spices. It’s pantry-friendly baking at its finest.
- Perfect for Halloween: They are spooky, cute, and kid-approved. My nieces love helping me pipe the shapes, and the chocolate chip eyes are the perfect finishing touch. They are great for party favors or a spooky snack after dinner.
- Crowd-Pleaser: Adults love the crispiness and the subtle vanilla flavor. Kids love the ghost shape. It’s a universal hit that disappears faster than you can bake it.
- Unbelievably Delicious: The texture is next-level. It’s like eating a cloud that has been toasted to perfection. Sweet, crisp, and melts in your mouth. It’s comfort food reimagined as a playful treat.
What makes this recipe different from the rest is the specific technique for drying them out. Many recipes call for a slightly higher temperature, but that risks browning the cookies. By keeping the oven low and letting them dry slowly, you get that pure, snowy white finish that makes the chocolate eyes pop. It’s a small detail that makes a huge difference in the final look and taste.
Also, these cookies are naturally gluten-free. That’s a huge bonus for accommodating guests with dietary restrictions without having to make a separate batch. It’s the kind of recipe that makes you feel like a hero for being thoughtful, yet it’s so easy you barely have to think about it.
What Ingredients You Will Need
This recipe uses simple, wholesome ingredients to deliver bold flavor and satisfying texture without the fuss. The magic of meringue lies in the purity of its components. Since there are only three main ingredients, quality matters more than ever. You can’t hide behind complex flavors here. Every bite needs to be clean, sweet, and crisp.
For the Meringue Base
- Egg Whites: Large egg whites, room temperature. I recommend using pasteurized egg whites if you are concerned about raw egg safety, but fresh eggs work beautifully. Room temperature whites whip up faster and achieve greater volume, which is key for that airy texture.
- Granulated Sugar: White granulated sugar. I prefer organic cane sugar for its clean taste. The sugar needs to dissolve completely into the egg whites, so fine granules work best. Avoid coarse sugars like turbinado, as they won’t dissolve fully and will leave a gritty texture.
- Vanilla Extract: Pure vanilla extract. Skip the imitation stuff. A high-quality vanilla adds a depth of flavor that balances the sweetness of the sugar. Just a teaspoon is enough to infuse the cookies with that warm, aromatic scent.
- Cream of Tartar: This is the secret weapon. It stabilizes the egg whites, preventing them from collapsing. It helps create those stiff peaks that hold the ghost shape. You only need a pinch, but it makes all the difference.
For the Ghostly Details
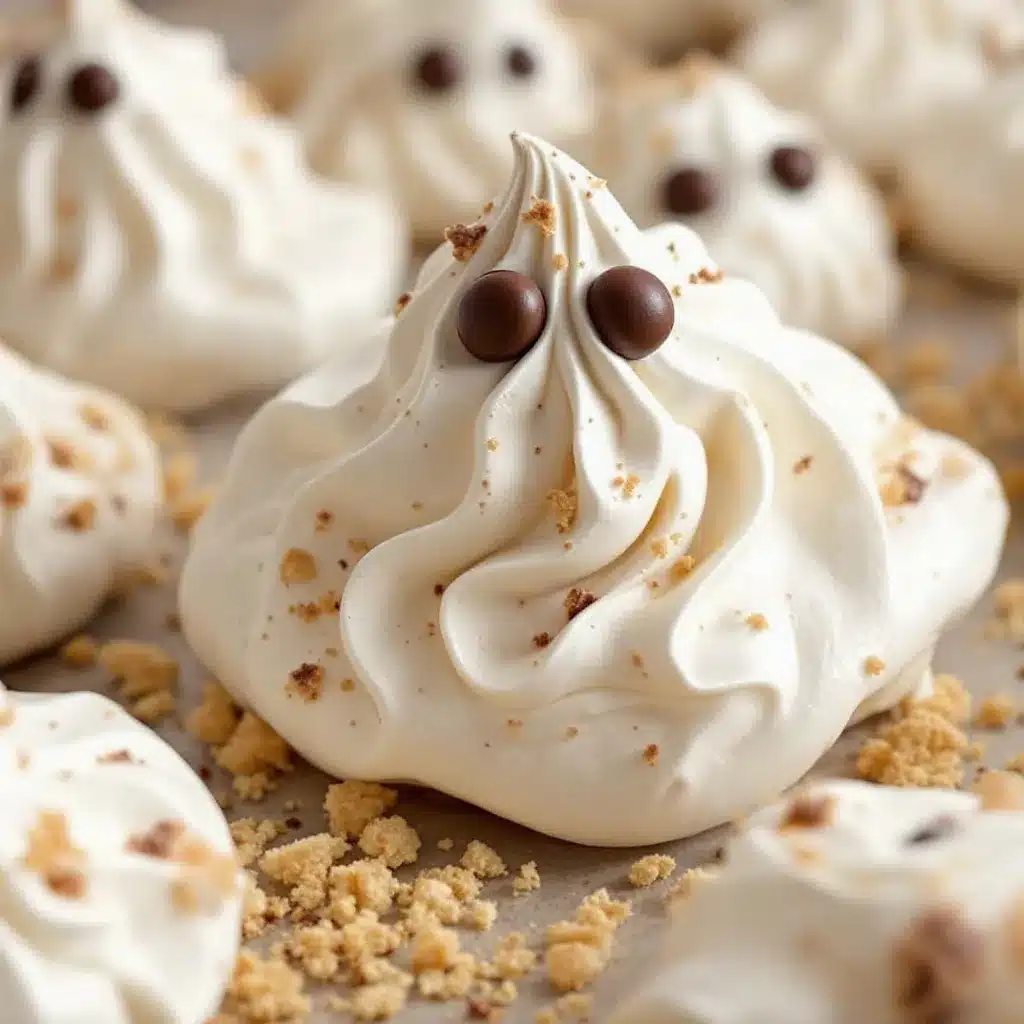
- Mini Chocolate Chips: Semi-sweet mini chocolate chips. I use Ghirardelli or Guittard for their consistent melt and rich flavor. Mini chips are easier to handle as eyes than standard chips, which are often too large. They provide that perfect contrast to the white meringue.
Substitution Tips: If you are allergic to eggs, you can use aquafaba (the liquid from a can of chickpeas) as a substitute for egg whites. It whips up similarly, though the texture might be slightly less crisp. For a dairy-free option, ensure your chocolate chips are certified dairy-free, as some contain milk solids.
Pro Tip: Make sure your mixing bowl is completely clean and free of any grease or yolk. Even a tiny drop of egg yolk can prevent the whites from whipping up properly. I wipe my bowl with a paper towel dipped in vinegar before starting to be safe.
Equipment Needed
You don’t need a fancy kitchen to make these cookies. Most of the tools are standard items you probably already own. Here is what you will need to get the job done:
- Stand Mixer or Hand Mixer: A stand mixer with a whisk attachment is ideal, as it frees up your hands. However, a hand mixer works perfectly fine if you don’t have a stand mixer. Just be prepared to hold it for a few minutes.
- Baking Sheets: Two standard baking sheets. I recommend using light-colored aluminum sheets, as dark sheets can cause the bottoms of the cookies to brown too quickly.
- Parchment Paper: Always line your baking sheets with parchment paper. This prevents sticking and makes cleanup a breeze. Silicone baking mats are also a great alternative if you prefer reusability.
- Piping Bags: Disposable piping bags or a reusable silicone one. I find disposable bags easier for this shape because you can just fill, pipe, and toss. If you don’t have piping bags, you can use a Ziploc bag with a corner cut off.
- Tweezers: A pair of kitchen tweezers is helpful for placing the chocolate chip eyes. It’s much more precise than using your fingers, which can leave fingerprints on the delicate meringue.
If you don’t have a stand mixer, don’t worry. I’ve made these by hand before, and they turned out just fine. It just takes a bit more arm strength. The key is consistency in your whisking motion. And for the tweezers, any clean pair will do. It’s all about precision in those final details.
Preparation Method
Let’s get into the nitty-gritty. Making these crispy ghost meringue cookies with chocolate chip eyes is straightforward, but attention to detail is crucial. Follow these steps closely for the best results.
- Prep the Oven and Sheets (5 minutes): Preheat your oven to 200°F (95°C). This low temperature is non-negotiable. It allows the cookies to dry out slowly without browning. Line your baking sheets with parchment paper. Make sure the parchment is flat and smooth to ensure even baking.
- Whip the Egg Whites (5 minutes): In a clean, grease-free bowl, add the egg whites and cream of tartar. Using your mixer on medium speed, beat until soft peaks form. Soft peaks mean the peaks curl over when you lift the whisk. This usually takes about 2-3 minutes.
- Add the Sugar (3 minutes): Slowly pour in the granulated sugar, one tablespoon at a time, while continuing to beat on medium-high speed. Be careful not to pour it too fast, or it might splash. Once all the sugar is added, increase the speed to high and beat until stiff, glossy peaks form. This should take another 3-5 minutes. The meringue should look shiny and hold its shape firmly when you lift the whisk.
- Flavor and Fold (1 minute): Add the vanilla extract and gently fold it in with a spatula. Be gentle here. You don’t want to deflate the air you’ve worked so hard to incorporate. Just a few gentle folds are enough to distribute the flavor.
- Pipe the Ghosts (10 minutes): Transfer the meringue to a piping bag fitted with a round tip (or just cut a corner off a Ziploc bag). Pipe small, round mounds onto the prepared baking sheets. For the ghost shape, pipe a round base and then a smaller, slightly irregular round on top. Don’t worry about perfect symmetry; the charm is in the imperfection. Leave about an inch between each cookie, as they don’t spread much but need room for air circulation.
- Initial Bake (1 hour): Place the baking sheets in the oven. Bake for 1 hour. The cookies should feel firm on the outside but might still feel slightly soft in the very center. This is normal.
- Add the Eyes (2 minutes): After the first hour, open the oven door quickly and place two mini chocolate chips on each cookie for eyes. Close the door immediately to maintain the temperature. Be quick so the heat doesn’t escape.
- Final Dry (1-2 hours): Return the cookies to the oven for another 1 to 2 hours. They are done when they are completely dry and crisp all the way through. To test, try to lift a cookie; it should release easily from the parchment. If it sticks, it needs more time. Turn off the oven and leave the cookies inside with the door slightly ajar (you can wedge a wooden spoon in the door) for another hour to cool completely. This residual drying ensures maximum crispiness.
Timing can vary depending on your oven and humidity. If it’s a humid day, you might need extra time. Don’t rush the cooling process; letting them cool in the turned-off oven helps them stay crisp.
Cooking Tips & Techniques
I’ve made my fair share of meringue disasters over the years. Some were under-whipped and collapsed. Others were over-baked and turned yellow. Here are some tips to help you avoid those pitfalls and get it right the first time.
Room Temperature Egg Whites: I know it’s tempting to use cold eggs straight from the fridge, but room temperature whites whip up to a greater volume. If you forgot to take them out, you can microwave them on low power for 10-15 seconds. Just don’t cook them!
Clean Bowl is Key: I cannot stress this enough. Any trace of fat (yolk, oil, butter) will prevent the egg whites from whipping. Wipe your bowl with vinegar or lemon juice before starting. It’s a small step that saves you from heartbreak.
Don’t Rush the Sugar: Adding the sugar too quickly can weigh down the egg whites. Take your time, adding it gradually. This ensures the sugar dissolves completely, resulting in a smooth, glossy meringue rather than a grainy one.
Humidity Matters: Meringue is hygroscopic, meaning it absorbs moisture from the air. If you live in a humid climate, these cookies might take longer to dry. Consider making them on a dry day, or leave them in the turned-off oven for an extended period to ensure they are fully crisp.
Patience with the Oven: Resist the urge to open the oven door frequently. Every time you open it, you let out heat, which can cause the cookies to crack or collapse. Trust the low, steady heat. It’s the only way to get that pure white color.
Testing for Doneness: The touch test is your best friend. Gently press the bottom of a cookie. If it feels hard and crisp, it’s done. If it feels soft or sticky, it needs more time. It’s better to over-dry slightly than to have a soft, chewy center, unless that’s what you prefer.
Variations & Adaptations
While the classic ghost shape is iconic, there are plenty of ways to tweak this recipe to suit your tastes or dietary needs. Here are a few ideas that I’ve tried and loved.
- Colorful Ghosts: Add a drop of food coloring to the meringue before piping. Pastel colors like lavender, mint green, or pale orange work beautifully for Halloween. Just add the color after the sugar is incorporated to avoid deflating the mixture.
- Flavor Twists: Swap the vanilla extract for almond extract for a marzipan-like flavor. Or add a teaspoon of citrus zest (lemon or orange) for a bright, fresh note. Spices like a pinch of cinnamon or nutmeg can also add warmth, though they might slightly alter the color.
- Chocolate Dipping: Once the cookies are completely cool, dip the bottom half in melted dark, milk, or white chocolate. Let it set on parchment paper. This adds a rich, decadent contrast to the light meringue.
- Gluten-Free & Vegan: As mentioned, aquafaba can replace egg whites for a vegan version. Use a vegan sugar if needed, though standard granulated sugar is usually vegan. These cookies are naturally gluten-free, so no flour substitutions are necessary.
- Shape Variations: If you’re not feeling the ghost vibe, pipe the meringue into other shapes. Hearts for Valentine’s Day, stars for the 4th of July, or simple rounds for any occasion. The technique remains the same.
I once tried adding cocoa powder to the mix, but it changed the texture too much, making it denser. Stick to dry mix-ins that don’t add moisture, like powdered sugar or cocoa powder mixed with a bit of cornstarch, if you want to experiment. But honestly, the classic white ghost is hard to beat.
Serving & Storage Suggestions
These crispy ghost meringue cookies with chocolate chip eyes are best enjoyed fresh, but they hold up surprisingly well if stored properly. Here is how to keep them perfect.
Serving: Serve them at room temperature. They pair beautifully with a cup of hot coffee or tea. The crispiness contrasts nicely with the warmth of the beverage. They are also great for Halloween parties, displayed in a clear glass jar or on a tiered stand. Kids love picking them out, so consider setting up a “decorate your own ghost” station with different colored chocolate chips.
Storage: Store the cookies in an airtight container at room temperature. They will keep for up to two weeks. If your kitchen is humid, add a packet of silica gel (food safe) to the container to absorb excess moisture. Avoid refrigerating them, as the cold and moisture can make them sticky and soft.
Freezing: You can freeze the baked cookies for up to three months. Place them in a single layer in a freezer-safe container, separated by parchment paper. Thaw them at room temperature in their container to prevent condensation from forming on the cookies. Do not freeze the unbaked meringue, as it will weep and lose its structure.
Reheating: You generally don’t need to reheat them. However, if they have absorbed some moisture and feel slightly soft, you can place them in a 200°F oven for 10-15 minutes to crisp them back up. Let them cool completely before serving.
The flavors don’t really change over time, but the texture is what matters most. The crispiness is the star of the show, so keeping them dry is the priority.
Nutritional Information & Benefits
While these cookies are definitely a treat, they are relatively light compared to traditional baked goods. Here is a general overview of the nutritional profile per cookie (approximate values):
- Calories: 15-20 calories per small cookie.
- Carbohydrates: 3-4 grams (mostly from sugar).
- Fat: 0 grams (naturally fat-free, unless you add chocolate chips or dips).
- Protein: 0.5 grams (from the egg whites).
- Sugar: 3 grams.
One of the biggest benefits of meringue is that it is naturally gluten-free. This makes it a safe option for those with celiac disease or gluten sensitivity, provided all other ingredients are certified gluten-free. Egg whites are also a good source of protein, though the amount in a small cookie is minimal.
From a wellness perspective, these cookies satisfy sweet cravings without the heaviness of flour-based desserts. They are airy and light, so you can enjoy a few without feeling overly full. However, due to the high sugar content, they should be enjoyed in moderation. For a healthier twist, you can use a sugar substitute like erythritol or monk fruit, though the texture may vary slightly.
I always try to balance my baking with mindful eating. These cookies are perfect for special occasions or when you need a quick pick-me-up. They remind us that indulgence doesn’t have to be complicated.
Conclusion
Making these crispy ghost meringue cookies with chocolate chip eyes is more than just baking; it’s a moment of quiet creativity. Whether you are baking for Halloween, a party, or just for yourself, these cookies bring a touch of whimsy and joy. They are easy to make, naturally gluten-free, and absolutely delicious. I hope you try this recipe and find your own quiet ritual in the kitchen.
Feel free to experiment with colors, flavors, and shapes. Make them your own. And if you do, I’d love to hear about it! Share your creations on social media or leave a comment below with your tips and variations. Don’t forget to pin this recipe to your Halloween baking board for later. Happy baking, and enjoy those spooky, sweet treats!
FAQs
Why did my meringue collapse?
Meringue can collapse if the egg whites are under-whipped or if the sugar wasn’t fully dissolved. Make sure you whip until stiff, glossy peaks form, and add the sugar slowly. Also, ensure your bowl is completely grease-free.
Can I use egg yolks for this recipe?
No, meringue is made from egg whites only. Egg yolks contain fat, which prevents the whites from whipping up into stiff peaks. Save the yolks for making custard or hollandaise sauce.
How do I know when the meringue cookies are done?
They are done when they are completely dry and crisp all the way through. They should release easily from the parchment paper. If they feel soft or sticky, they need more time in the oven.
Can I make these ahead of time?
Yes, these cookies can be made up to two weeks in advance. Store them in an airtight container at room temperature. They will stay crisp if kept dry.
What if I don’t have a piping bag?
You can use a Ziploc bag with a corner cut off as a makeshift piping bag. Just fill it with the meringue, seal it, and cut a small hole in one corner. It works just as well for small cookies.
Pin This Recipe!
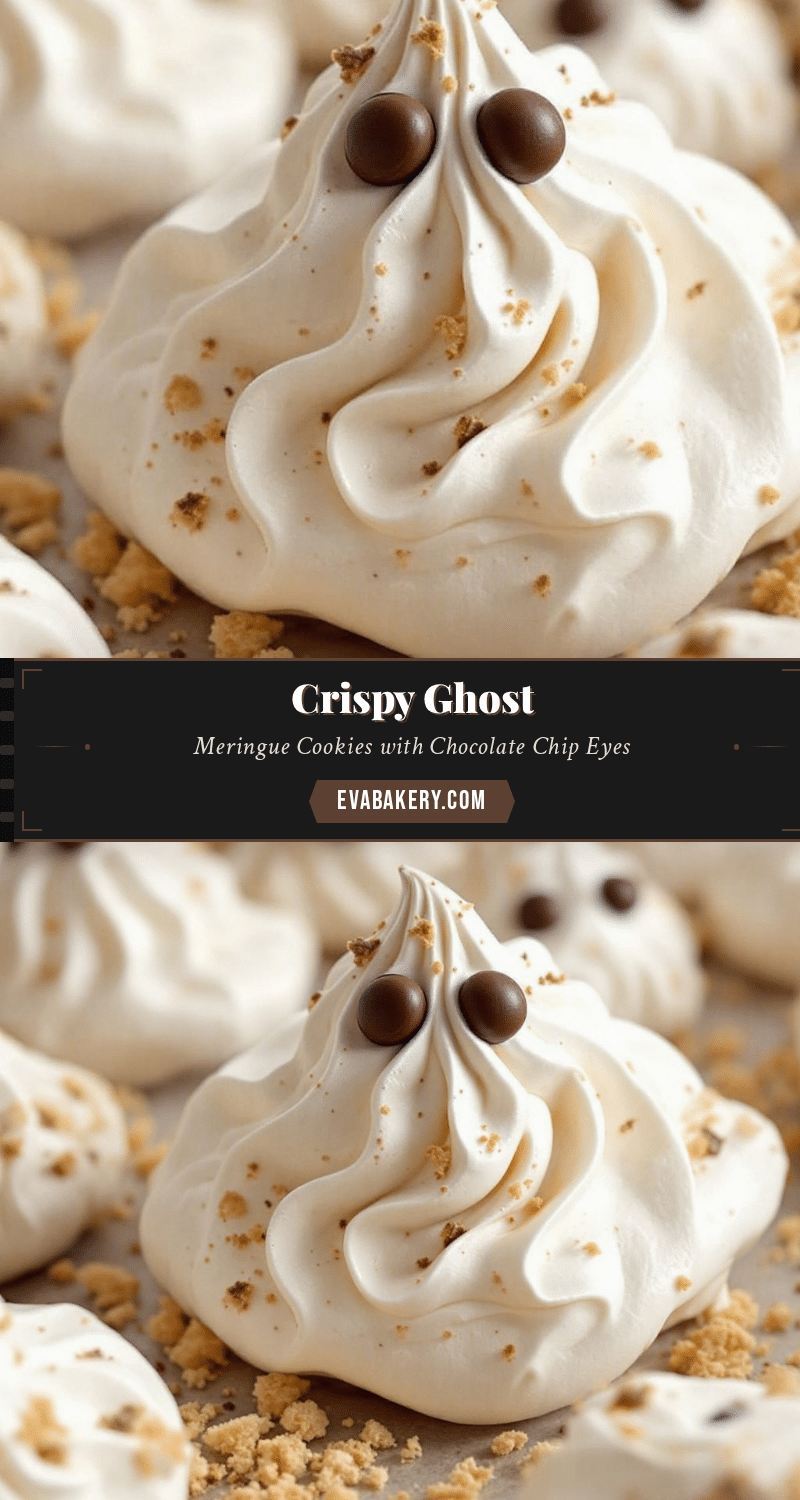
Crispy Ghost Meringue Cookies: Easy Halloween Treats

These crispy ghost meringue cookies with chocolate chip eyes are a playful, naturally gluten-free Halloween treat. With simple ingredients and a low-temperature baking method, they offer a delicate, airy texture that melts in your mouth.
- Prep Time: 20 minutes
- Cook Time: 2-3 hours
- Total Time: 2 hours 20 minutes
- Yield: Approximately 24 cookies
- Category: Dessert
- Cuisine: American
Ingredients
- Large egg whites, room temperature
- Cream of tartar
- Granulated sugar
- Pure vanilla extract
- Mini semi-sweet chocolate chips
Instructions
- Preheat oven to 200°F (95°C). Line baking sheets with parchment paper.
- In a clean, grease-free bowl, beat egg whites and cream of tartar on medium speed until soft peaks form.
- Slowly add granulated sugar, one tablespoon at a time, while beating on medium-high speed. Increase to high speed and beat until stiff, glossy peaks form.
- Gently fold in vanilla extract with a spatula.
- Pipe meringue into ghost shapes onto prepared baking sheets, leaving space between cookies.
- Bake for 1 hour.
- Remove from oven, place two mini chocolate chips on each cookie for eyes, and return to oven.
- Bake for another 1-2 hours until completely dry and crisp.
- Turn off oven and leave cookies inside with the door slightly ajar for 1 hour to cool and dry further.
Notes
Ensure mixing bowl is completely clean and grease-free. Room temperature egg whites whip better. Meringue is hygroscopic, so store in an airtight container away from humidity. Do not refrigerate.
Nutrition
- Serving Size: 1 cookie
- Calories: 18
- Sugar: 3
- Carbohydrates: 3.5
- Protein: 0.5
Keywords: Halloween, meringue, cookies, gluten-free, vegan option, easy baking, spooky treats, chocolate chip eyes


