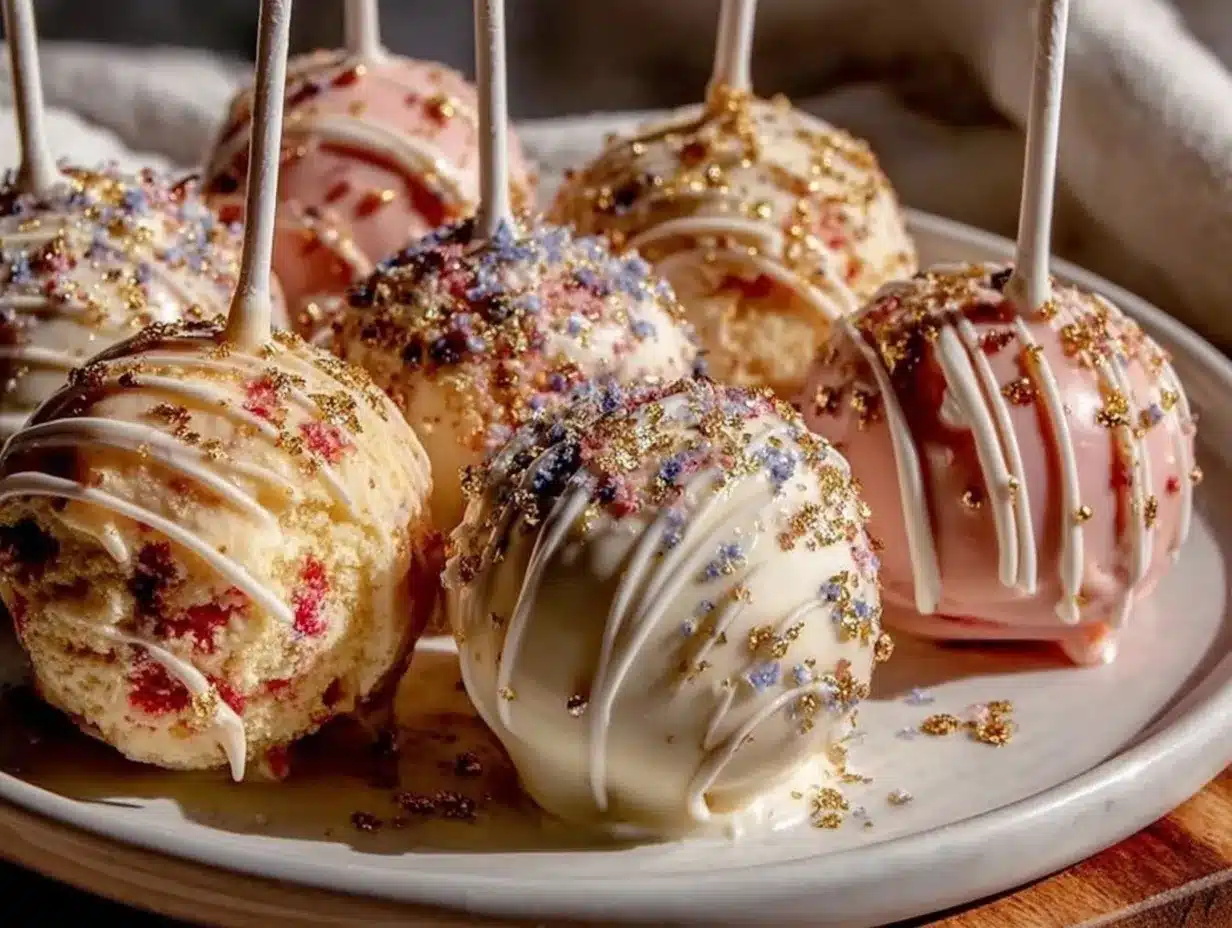
“Are you team pink or team blue?” That’s the kind of question I found myself answering more times than I can count last spring, all while assembling what turned out to be the perfect He or She cake pop platter with gold glitter sticks. Honestly, it started as a bit of a last-minute scramble. I’d promised a friend I’d help with her gender reveal party—and, well, I’m not exactly known for my party-planning skills. The evening before, I stumbled upon the idea of cake pops because they’re bite-sized, fun, and, let’s face it, pretty foolproof.
I was skeptical at first. Cake pops? Glitter sticks? Could it really be that simple to pull off something so stylish and festive? But as I dipped, decorated, and arranged those little spheres of cake, something clicked. The gold glitter sticks added just the right touch of sparkle without going overboard. And the smiles when guests saw the platter? Priceless.
That night, standing in a quiet kitchen with crumbs everywhere and a glitter trail on the counter, I realized this wasn’t just a cute party treat. It was a sweet moment wrapped in sugar and surprise. This recipe stuck with me because it’s easy to personalize, looks stunning, and honestly, it’s just plain fun to make. So, if you’re planning a celebration where the question “he or she?” hangs in the air, this cake pop platter might be the answer you didn’t know you needed.
Why You’ll Love This Recipe
After making these cake pops several times (more than I’d like to admit), I can say this recipe has become my go-to for gender reveal parties and similar celebrations. Here’s why:
- Quick & Easy: You can whip up the cake pops in under 2 hours, including chilling time. Perfect for last-minute hosts or busy parents juggling a million things.
- Simple Ingredients: Nothing fancy here—basic cake mix, frosting, and candy melts. Chances are, you already have what you need or can grab it on your next grocery run.
- Perfect for Celebrations: Whether it’s a gender reveal, baby shower, or even a fun birthday twist, these cake pops shine on any festive platter.
- Crowd-Pleaser: Kids and adults alike gobble these up. The bite-sized nature makes them easy to enjoy without the mess of a big slice of cake.
- Unbelievably Delicious: The moist cake center paired with a smooth candy coating and the subtle crunch of the glitter stick is a texture dream.
What makes this version stand out? The gold glitter sticks aren’t just for show—they add a touch of glam that lifts the entire platter. Plus, the technique I use for mixing the cake and frosting ensures every bite is perfectly moist, without being too dense or crumbly. I’ve tried other methods, but this one strikes just the right balance every time.
Honestly, it’s the kind of treat that has people closing their eyes for a moment after the first bite—comfort food with a little sparkle, exactly what a celebration deserves.
What Ingredients You Will Need
This recipe relies on simple, wholesome ingredients to deliver bold flavor and a satisfying texture without any fuss. Most of these are pantry staples, and substitutions are easy if you’re catering to dietary needs.
- For the Cake Pops:
- 1 box of white or yellow cake mix (about 15.25 oz / 432 g)
- 3 large eggs (room temperature)
- 1/2 cup (120 ml) vegetable oil or melted butter
- 1 cup (240 ml) water or milk (milk adds richness)
- 1/2 cup (115 g) unsalted butter, softened (for frosting)
- 1 1/2 cups (180 g) powdered sugar
- 1 tsp vanilla extract (adds warmth and depth)
- For the Coating:
- 20 oz (567 g) white candy melts or chocolate melts (I prefer Wilton brand for smooth melting)
- Pink and blue food coloring gels (use sparingly for vibrant color)
- For Decoration:
- 20 gold glitter sticks (about 6 inches / 15 cm long; available at craft stores)
- Edible gold glitter or shimmer dust (optional, for extra sparkle)
- Sprinkles or edible pearls (optional for added texture)
Ingredient tips: If you need a gluten-free option, use a gluten-free cake mix and double-check candy melts for gluten content. Dairy-free swaps can be made by replacing butter with coconut oil and milk with almond or oat milk. For a natural color twist, beet juice works well for pink, and spirulina powder can lend a soft blue hue.
Equipment Needed
Let me walk you through what you’ll want on hand to make these cake pops without a hitch:
- Mixing bowls: A couple of medium-sized bowls for batter and frosting mixing.
- Electric mixer: Handheld or stand mixer to get a smooth, lump-free batter and frosting. I’ve tried whisking by hand, but it’s a workout and less consistent.
- Baking sheet and parchment paper: Essential for baking the cake and chilling the cake pop balls.
- Microwave-safe bowl or double boiler: For melting candy melts carefully without scorching.
- Styrofoam block or cake pop stand: To hold the pops upright while the coating sets. If you don’t have these, a shallow bowl filled with rice works in a pinch.
- Small spatula or spoon: For mixing and scooping the cake and frosting mixture.
- Toothpicks: Handy for swirling food coloring or checking cake doneness.
If you’re on a budget, you can improvise with household items. For example, use a cup or glass as a stand to hold the sticks, and a fork to help dip the pops. Just be cautious with the candy melts—melting them low and slow prevents clumping.
Preparation Method
- Prepare the Cake: Preheat your oven to 350°F (175°C). In a large bowl, combine the cake mix, eggs, oil, and water or milk. Mix with an electric mixer on medium speed for about 2 minutes until smooth. Pour batter into a greased 9×13-inch (23×33 cm) baking pan. Bake for 25-30 minutes or until a toothpick inserted in the center comes out clean. Let cool completely, about 1 hour.
- Make the Frosting: In a separate bowl, beat the softened butter until creamy, about 1 minute. Gradually add powdered sugar and vanilla extract, beating until smooth and fluffy.
- Form the Cake Pop Balls: Crumble the cooled cake into fine crumbs using your hands or a food processor. Add frosting a little at a time, mixing with a spoon or your hands until the mixture holds together but isn’t too wet—think playdough texture. Roll into 1.5-inch (4 cm) balls and place on a parchment-lined baking sheet. Chill in the fridge for at least 1 hour to firm up.
- Color the Candy Melts: Melt white candy melts in a microwave-safe bowl in 30-second intervals, stirring in between, until smooth. Divide the melted candy into two bowls. Add pink gel to one and blue gel to the other, stirring gently to mix without thickening.
- Attach Gold Glitter Sticks: Dip one end of each gold glitter stick into the matching colored candy melt and insert halfway into each chilled cake ball. This helps secure the stick in place. Return to the fridge for 15 minutes to set.
- Coat the Cake Pops: Dip each cake pop into the colored candy melt, turning to cover completely. Gently tap off excess and, if desired, sprinkle with edible gold glitter or pearls before the coating sets. Insert the sticks into your foam block or cake pop stand to dry upright, about 20-30 minutes.
- Arrange the Platter: Once dry, arrange the pops on a decorative platter alternating pink and blue. Add extra edible glitter dust or fresh flowers around the base for a stunning presentation.
Pro tip: If your candy coating thickens while dipping, warm it gently again; thick candy melts can cause uneven coverage or clumping. Also, don’t skip chilling the cake balls—it’s key for keeping the pops intact when dipping.
Cooking Tips & Techniques
Mastering cake pops is mostly about patience and attention to detail. Here are some tips I picked up after a few messy first tries:
- Don’t overmix the frosting into the cake crumbs. Too much frosting makes the mixture too soft and sticky, causing the pops to fall apart.
- Chill the cake balls thoroughly. This helps them hold their shape during dipping—otherwise, they can crumble or slide off the stick.
- Temper your candy melts gently. High heat causes the candy to seize or burn. Microwave in short bursts and stir often.
- Use a deep, narrow bowl for dipping. It helps cover the cake pop fully without drips everywhere.
- Tap off excess coating lightly. Too much candy melt pooling at the base makes drying slower and messier.
- Experiment with food coloring. Gel colors work best because they don’t thin the candy melts like liquid colors do.
Once, I learned the hard way that skipping the chilling step meant my cake pops basically turned into cake mush on the stick. After that, I never rushed the fridge time. Also, multitasking helps—prepare the cake, then chill while melting the candy melts and mixing colors.
Variations & Adaptations
Want to switch things up? Here are some ideas to make this cake pop platter your own:
- Dietary swaps: Use a gluten-free cake mix, dairy-free butter substitutes, and coconut or almond milk for a friendly version.
- Flavor twists: Add a teaspoon of almond or lemon extract to the frosting for a subtle zing. Or fold in mini chocolate chips before rolling the balls.
- Seasonal themes: Swap pink and blue for pastel shades in spring, or red and green for a festive holiday vibe.
- Alternative coatings: Try dark chocolate or colored candy melts in metallic shades like silver or rose gold for extra glam.
- Stick options: Instead of gold glitter sticks, use striped paper straws or simple white sticks decorated with ribbon bows.
I once made a batch with lavender frosting and pale purple candy melts for a friend’s baby shower. It felt special without being over the top—proving you can tailor these cake pops for any occasion or taste.
Serving & Storage Suggestions
These cake pops are best served at room temperature, about 15 minutes after taking them out of the fridge. This lets the candy coating soften slightly for the perfect bite.
Arrange them on a beautiful platter with some fresh flowers or greenery to add an elegant touch. They go wonderfully alongside drinks like the refreshing champagne punch or a light sparkling sangria.
To store, keep cake pops in an airtight container in the fridge for up to 5 days. For longer storage, they freeze well for up to 3 months—just thaw in the fridge overnight before serving.
Reheat gently by letting them sit at room temperature to bring out the flavors, but avoid microwaving as that can melt the coating.
Over time, the cake texture actually softens and the flavors meld beautifully, making leftovers even tastier a day later (if there are any!).
Nutritional Information & Benefits
Each cake pop contains roughly 150-180 calories, depending on the cake mix and frosting amounts used. While they’re definitely a treat, the portion-controlled size helps with mindful indulgence.
The white or yellow cake base provides simple carbs for quick energy, while the butter and candy melts add fats that satisfy cravings. Using real butter and quality ingredients means you’re not loading up on artificial additives.
For those with dietary needs, the recipe adapts easily to gluten-free or dairy-free alternatives without losing charm or flavor. Just be mindful of possible allergens like eggs and dairy when serving guests.
From a wellness standpoint, I appreciate that these cake pops offer a festive way to enjoy dessert without going overboard—perfect for celebrations that call for a little sparkle and sweetness, but not a sugar overload.
Conclusion
Making the perfect He or She cake pop platter with gold glitter sticks turned out to be one of those happy accidents that now feels like a must-have party staple. It’s easy, fun, and irresistibly charming—bringing a little magic to any celebration.
Feel free to tweak the colors, flavors, and decorations to fit your style or event. I love how adaptable this recipe is, and it always gets a crowd smiling.
Give it a try, and let those cake pops bring a touch of sparkle and joy to your next gathering. And hey, if you’re interested in more party-perfect recipes, there’s plenty of inspiration like the fluffy mini quiches or the crispy prosciutto-wrapped asparagus bites that pair wonderfully with sweet treats.
FAQs
How long do cake pops last?
Stored in an airtight container in the fridge, cake pops stay fresh for up to 5 days. You can also freeze them for up to 3 months.
Can I make cake pops without a cake mix?
Absolutely! You can bake a homemade cake from scratch and use it instead of a box mix. Just be sure it’s fully cooled before crumbling.
What if my cake balls fall off the sticks?
This usually happens if the cake balls aren’t chilled enough or the candy melts are too thick. Make sure to chill thoroughly and dip the stick end in candy melts before inserting to help secure.
Can I use regular lollipop sticks instead of gold glitter sticks?
Yes, plain lollipop sticks or even decorative paper straws work fine. The gold glitter sticks add a special touch but aren’t required.
How do I prevent cracks in the candy coating?
Temper the candy melts gently and avoid dipping cold cake balls straight from the fridge. Let them sit a few minutes at room temperature to reduce cracking.
Pin This Recipe!
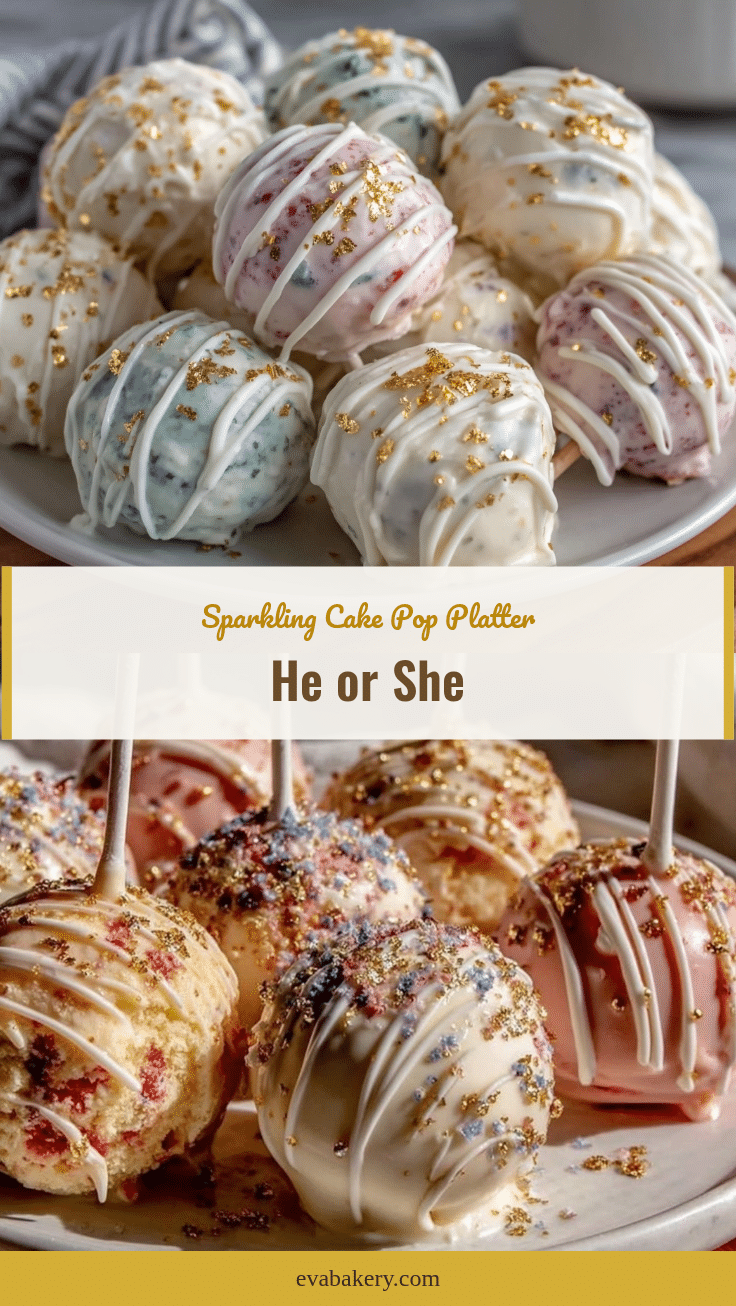
Perfect He or She Cake Pop Platter with 20 Easy Gold Glitter Stick Ideas

These cake pops are a quick, easy, and festive treat perfect for gender reveal parties and celebrations, featuring a moist cake center coated in colored candy melts and decorated with gold glitter sticks.
- Prep Time: 20 minutes
- Cook Time: 30 minutes
- Total Time: 2 hours 15 minutes
- Yield: 20 cake pops 1x
- Category: Dessert
- Cuisine: American
Ingredients
- 1 box of white or yellow cake mix (about 15.25 oz / 432 g)
- 3 large eggs (room temperature)
- 1/2 cup (120 ml) vegetable oil or melted butter
- 1 cup (240 ml) water or milk (milk adds richness)
- 1/2 cup (115 g) unsalted butter, softened (for frosting)
- 1 1/2 cups (180 g) powdered sugar
- 1 tsp vanilla extract
- 20 oz (567 g) white candy melts or chocolate melts
- Pink and blue food coloring gels
- 20 gold glitter sticks (about 6 inches / 15 cm long)
- Edible gold glitter or shimmer dust (optional)
- Sprinkles or edible pearls (optional)
Instructions
- Preheat oven to 350°F (175°C). In a large bowl, combine cake mix, eggs, oil, and water or milk. Mix with electric mixer on medium speed for about 2 minutes until smooth.
- Pour batter into a greased 9×13-inch (23×33 cm) baking pan. Bake for 25-30 minutes or until a toothpick inserted in the center comes out clean. Let cool completely, about 1 hour.
- In a separate bowl, beat softened butter until creamy, about 1 minute. Gradually add powdered sugar and vanilla extract, beating until smooth and fluffy.
- Crumble cooled cake into fine crumbs using hands or food processor. Add frosting a little at a time, mixing until mixture holds together but isn’t too wet. Roll into 1.5-inch (4 cm) balls and place on parchment-lined baking sheet. Chill in fridge for at least 1 hour.
- Melt white candy melts in microwave-safe bowl in 30-second intervals, stirring in between until smooth. Divide melted candy into two bowls. Add pink gel to one and blue gel to the other, stirring gently.
- Dip one end of each gold glitter stick into matching colored candy melt and insert halfway into each chilled cake ball. Return to fridge for 15 minutes to set.
- Dip each cake pop into colored candy melt, turning to cover completely. Tap off excess and sprinkle with edible gold glitter or pearls if desired. Insert sticks into foam block or cake pop stand to dry upright for 20-30 minutes.
- Arrange cake pops on a decorative platter alternating pink and blue. Add extra edible glitter dust or fresh flowers for presentation.
Notes
Chill cake balls thoroughly before dipping to prevent them from falling apart. Temper candy melts gently to avoid burning or clumping. Use gel food coloring for best results. If candy coating thickens, warm gently again before dipping.
Nutrition
- Serving Size: 1 cake pop
- Calories: 165
- Sugar: 18
- Sodium: 120
- Fat: 8
- Saturated Fat: 4.5
- Carbohydrates: 22
- Fiber: 0.2
- Protein: 1.5
Keywords: cake pops, gender reveal, party treats, gold glitter sticks, easy dessert, celebration dessert, cake pop platter


