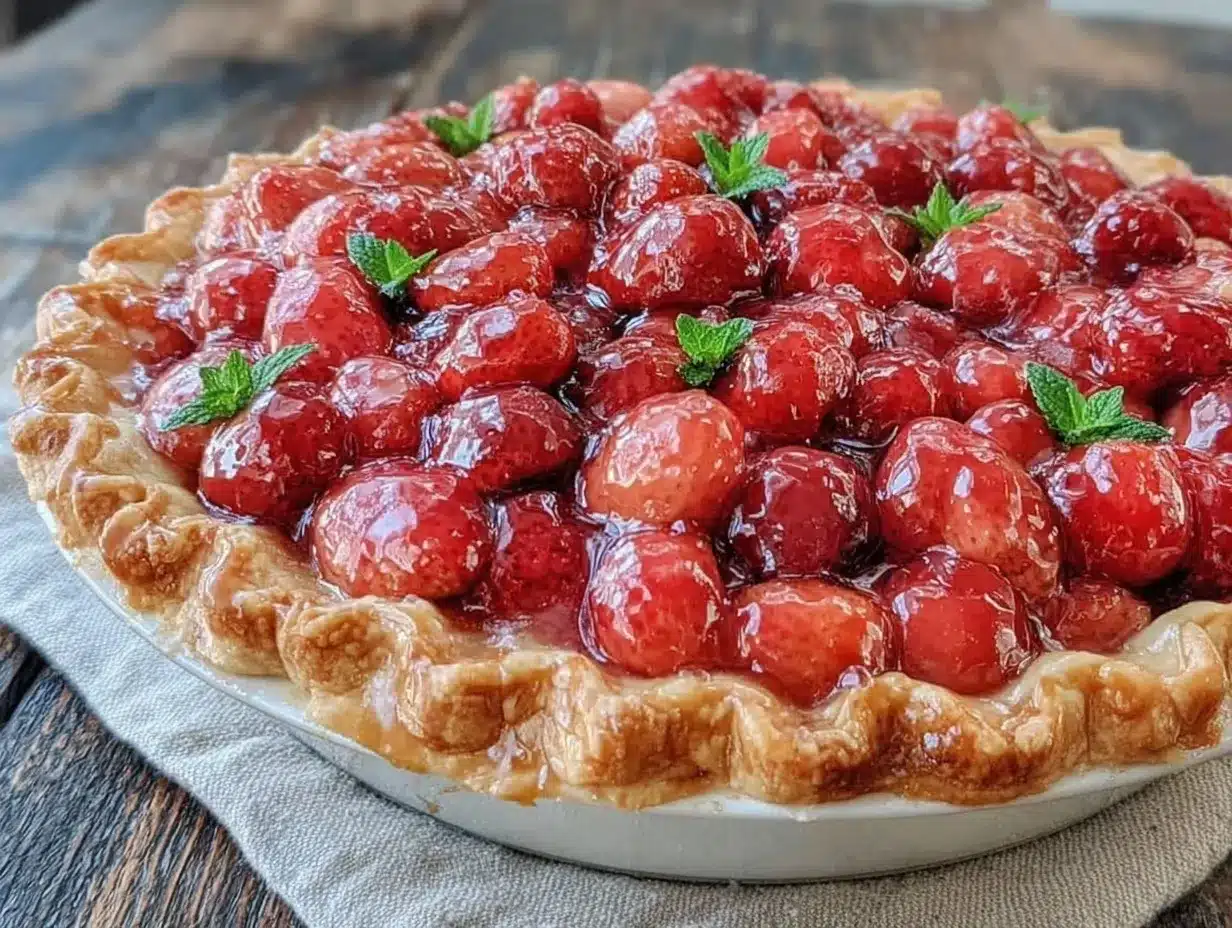
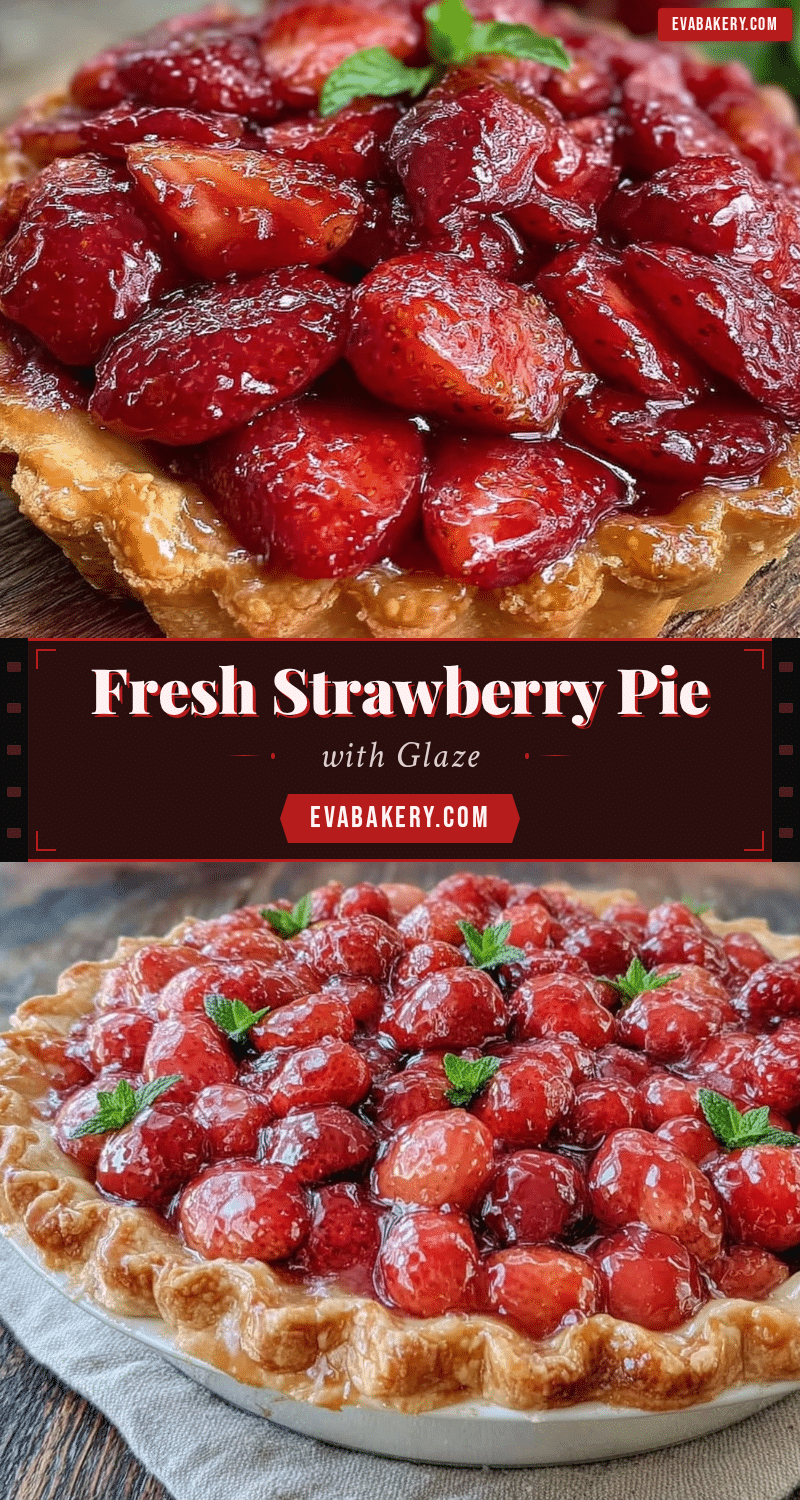
One summer afternoon about five years ago, I found myself hosting an impromptu family get-together with barely any time to plan. The pantry was modestly stocked, but the fridge held a bounty of freshly picked strawberries from a local farm stand. I wanted something that felt special but wouldn’t have me glued to the oven for hours. That’s when I threw together what would become my fresh strawberry pie with glaze—a pie so simple yet so irresistibly good that my whole family ended up asking for seconds (and thirds).
What makes this strawberry pie stand out isn’t just the juicy berries or the flaky crust, but the glossy, slightly sweet glaze that ties everything together. It’s like a fruit hug in pie form—shiny, fresh, and every bite bursting with flavor. I’ve made this recipe dozens of times since then, tweaking the glaze here, adjusting the crust there, until it became the pie I proudly bring to every party, potluck, and lazy weekend dessert.
If you’re wondering how to make a strawberry pie that feels both homemade and a little fancy, this is it. Plus, it pairs beautifully with simple drinks like the champagne punch I love to serve in spring and summer. Ready to dive in?
Why This Recipe Works
I’ve baked a ton of strawberry pies, and this one is hands-down the one I keep coming back to. Here’s why:
- Freshness that pops — Using ripe, juicy strawberries means the pie tastes like summer in every bite. No canned fruit or heavy syrups here, just pure berry goodness.
- Perfectly balanced glaze — The glaze isn’t overly sweet or sticky; it’s just enough to hold the berries in place while giving a beautiful shine. I’ve tested several glaze recipes, and this one nails the texture every time.
- Flaky homemade crust — The buttery crust adds a tender crunch that complements the soft berries. Bonus: you can make it ahead and freeze it, so dessert comes together in a snap.
- Family approved — I’m not joking when I say my kids and in-laws fight over the last slice. It’s that good.
- Simple yet impressive — You don’t need fancy tools or rare ingredients. If you can slice strawberries and mix a glaze, you’re already halfway there.
This pie is my go-to for celebrations big and small, and it’s the kind of recipe that makes you look like a pro without breaking a sweat. Plus, it’s one of those rare desserts that everyone actually wants to eat—no leftovers to worry about.
Ingredients Breakdown
Before you dive in, here’s a quick rundown of the ingredients and why I love each one. Most of these you probably have on hand already.
For the Crust:
- All-purpose flour (1 ¼ cups / 150g) — The base of the crust, providing just enough structure without making it tough. I use King Arthur flour for consistent results.
- Unsalted butter (½ cup / 113g, chilled and cubed) — This makes the crust flaky and flavorful. I never substitute margarine here; butter is non-negotiable.
- Granulated sugar (1 tablespoon / 12g) — Adds a subtle sweetness so the crust isn’t bland.
- Cold water (3-4 tablespoons / 45-60ml) — Helps bring the dough together without melting the butter.
- Salt (¼ teaspoon) — Enhances the flavor, balancing the sweetness.
For the Filling:
- Fresh strawberries (4 cups / 600g, hulled and sliced) — The star of the show. Use the ripest, juiciest berries you can find. If you freeze strawberries, thaw and drain them well to avoid sogginess.
- Granulated sugar (½ cup / 100g) — Sweetens the berries just enough without overpowering their natural flavor. Adjust depending on how sweet your strawberries are.
- Lemon juice (1 tablespoon / 15ml) — Brightens flavors and balances sweetness. Freshly squeezed is best.
- Cornstarch (3 tablespoons / 24g) — Thickens the filling so it sets nicely and doesn’t run all over the place.
For the Glaze:
- Strawberry jam (¼ cup / 80g) — Adds extra shine and sweetness. I prefer seedless jam so the glaze is smooth.
- Water (2 tablespoons / 30ml) — Thins the jam into a pourable glaze.
- Lemon juice (1 teaspoon / 5ml) — Keeps the glaze bright and fresh.
Pro tip: I like to buy my fresh strawberries from local farmers’ markets or pick-your-own farms when in season. It makes all the difference. And if you’re worried about your crust, you can always use a store-bought pie crust (though homemade is worth the extra effort). For a quick guide on flaky crust basics, this fluffy mini quiches crust tutorial is a fantastic resource.
Equipment You’ll Need
You don’t need a fancy kitchen setup for this. Here’s what I rely on:
- 9-inch pie dish — Glass or metal works fine, but metal tends to brown the crust better.
- Mixing bowls — One for your crust dough, one for the filling, and one for the glaze.
- Rolling pin — Essential for rolling out the crust evenly. No rolling pin? Use a clean wine bottle.
- Small saucepan — To warm and thin the strawberry jam for the glaze.
- Pastry brush — For spreading the glaze evenly over the berries.
- Sharp knife — To hull and slice strawberries.
- Measuring cups and spoons — Baking is chemistry, so measure carefully.
If you don’t have a pastry brush, you can use the back of a spoon to spread the glaze gently. I’ve made this pie plenty of times without a rolling pin or pastry brush and it still turns out great.
Step-by-Step Instructions
- Make the crust dough (10 minutes)
In a large bowl, whisk together the flour, sugar, and salt. Add the cold, cubed butter. Using a pastry cutter or your fingertips, work the butter into the flour until the mixture resembles coarse crumbs with pea-sized pieces. Add cold water one tablespoon at a time, mixing gently until the dough just comes together. Don’t overwork it—lumps of butter are good! Form the dough into a disk, wrap it in plastic, and chill in the fridge for at least 30 minutes (or up to 2 days). - Prepare the filling (5 minutes)
In a medium bowl, toss the sliced strawberries with sugar, lemon juice, and cornstarch. Set aside to macerate while you roll out the crust. You’ll see the berries release some juices—that’s perfect. - Preheat the oven and roll out the crust (15 minutes)
Preheat your oven to 375°F (190°C). On a lightly floured surface, roll out the chilled dough into a 12-inch circle, about ⅛-inch thick. Transfer it carefully to your pie dish, pressing it into the edges without stretching. Trim excess dough, leaving about ½ inch overhang. Fold the edges under and crimp as you like. - Bake the crust blind (20 minutes)
Line the crust with parchment paper and fill with pie weights or dried beans. Bake for 15 minutes, then remove weights and parchment and bake an additional 5 minutes until the crust is just starting to turn golden. This prevents sogginess from the juicy filling. - Fill and bake the pie (35-40 minutes)
Spoon the strawberry filling into the warm crust, spreading evenly. Bake at 375°F (190°C) for 35-40 minutes, until the filling is bubbly and the crust is golden brown. Keep an eye on the edges—if they brown too fast, cover them with foil. - Make the glaze (5 minutes)
While the pie bakes, combine the strawberry jam, water, and lemon juice in a small saucepan. Warm over low heat, stirring until smooth and pourable. Remove from heat and let cool slightly. - Glaze the pie (5 minutes)
As soon as the pie comes out of the oven, brush the glaze gently over the berries to give that irresistible shine. Let the pie cool completely on a wire rack before slicing.
Total time: about 1 hour 30 minutes, with 30 minutes active hands-on work.
Expert Tips & Troubleshooting
Making strawberry pie can be tricky, but I’ve learned some tricks the hard way so you don’t have to:
- Don’t skip blind baking the crust — It’s tempting to fill and bake all at once, but the crust will get soggy. Blind baking keeps it crisp.
- Use ripe, but not overripe strawberries — Too soft and the filling becomes mushy; too firm and the pie lacks juiciness. I pick berries that are a vibrant red but still hold their shape.
- Brush the glaze while the pie is warm — It spreads easier and creates that beautiful shine. If it cools too much, the glaze thickens and becomes clumpy.
- Cover crust edges if browning too fast — A simple foil tent prevents burning.
- Let the pie cool fully before slicing — The cornstarch needs time to set, or you’ll have runny filling.
- Chill your butter and water when making the dough — Warm ingredients make the crust tough. I keep a small bowl of ice water nearby for this.
If your glaze turns out too thick, warm it gently again with a splash of water. If your crust cracks while rolling, pop it in the fridge for 10 minutes to relax the dough before trying again.
Variations & Substitutions
Once you master this fresh strawberry pie with glaze, you can have some fun with twists:
- Mixed Berry Pie — Swap half the strawberries for blueberries or raspberries for a colorful variation.
- Strawberry-Rhubarb — Add 1 cup chopped rhubarb to the filling for a tart kick.
- Gluten-Free Crust — Use a 1:1 gluten-free baking flour blend in place of all-purpose flour.
- Vegan Option — Substitute butter with coconut oil or vegan butter and use a flax egg (1 tablespoon ground flaxseed + 3 tablespoons water) in the crust.
- Almond Crust — Add ½ cup finely ground almonds to the crust for a nutty flavor boost.
- Alternative Glazes — Use apricot jam or a mixture of honey and lemon juice for a different shine and flavor.
For more ideas on simple, crowd-pleasing appetizers and treats, you might enjoy the crispy prosciutto-wrapped asparagus bites—they’re always a hit at parties where I serve this pie.
Serving & Storage
This strawberry pie is best served slightly chilled or at room temperature. I like to slice it and serve with a dollop of whipped cream or a scoop of vanilla ice cream to balance the tartness.
For casual family meals, just plain is perfect—fresh and bright with that glossy glaze making every slice irresistible.
Storage:
- Room temperature: Store covered loosely with foil or plastic wrap for up to 2 days. The crust will soften a bit.
- Refrigerator: Keep covered in the fridge for up to 4 days. Bring slices to room temp before serving for best flavor.
- Freezing: Strawberry pies don’t freeze well after baking because the filling gets watery. If you want to prep ahead, freeze the baked crust and prepare the filling fresh.
Pro tip: If you’re serving this pie at a party, make it the day before for easier slicing and better flavor melding. For a full festive spread, pair it with a refreshing drink like the sparkling New Year’s sangria—the bubbles cut through the sweetness beautifully.
Nutrition Information
| Nutrient | Per Slice (1/8 pie) |
|---|---|
| Calories | 280 |
| Protein | 3g |
| Total Carbohydrates | 38g |
| Dietary Fiber | 3g |
| Sugars | 22g |
| Total Fat | 12g |
| Saturated Fat | 7g |
| Cholesterol | 30mg |
| Sodium | 160mg |
This pie is a treat, but it’s made with whole fruit and a homemade crust, so it feels like a slice of summer rather than just sugar and fat. Plus, strawberries are a great source of vitamin C and antioxidants.
Final Thoughts
So there you have it—my fresh strawberry pie with glaze recipe that’s earned a permanent spot on my dessert menu. It’s one of those recipes I don’t mind making again and again because everyone loves it, and it never gets old.
The balance of sweet, tart, and buttery makes it feel like a celebration, but it’s easy enough for a weeknight. Whether you’re baking for a family dinner, a picnic, or a big holiday gathering, this pie delivers that “wow” factor without any fuss.
If you give it a try, I’d love to hear how it goes—or if you added your own spin. Drop a comment below! And while you’re at it, maybe whip up a batch of bacon-wrapped dates or some perfect scallops with lemon butter sauce to round out your menu. Happy baking!
FAQs
- Can I use frozen strawberries for this pie?
- Yes, but thaw and drain them well to avoid a soggy crust. I recommend gently patting them dry with paper towels to remove excess moisture before mixing with sugar and cornstarch.
- Why is my pie watery after baking?
- Usually, this means the filling wasn’t thickened enough or the berries released too much juice. Make sure you use the right amount of cornstarch and don’t skip blind baking the crust. Also, try not to over-handle the berries when mixing.
- Can I make this pie gluten-free?
- Absolutely! Swap the all-purpose flour in the crust for a 1:1 gluten-free baking flour blend. The texture will be slightly different but still delicious.
- How long does this pie keep?
- Best eaten within 2 days at room temperature or up to 4 days refrigerated. Let it come to room temp before slicing for the best texture and flavor.
- Can I make the crust ahead of time?
- Yes! You can prepare the crust dough and freeze it for up to 2 months. Just thaw overnight in the fridge before rolling out.
- Do I have to use cornstarch in the filling?
- Cornstarch is key for thickening and setting the juicy filling. If you’re out, you can try arrowroot powder as a substitute (same amount), but don’t skip it entirely or the filling will be too runny.
- What’s the best way to slice this pie?
- Use a sharp, serrated knife for clean slices. For neatest results, chill the pie for a few hours before slicing to let the filling set firmly.
Pin This Recipe!
Fresh Strawberry Pie Recipe with Easy Glaze Your Family Will Crave

A simple yet irresistibly good fresh strawberry pie with a flaky homemade crust and a perfectly balanced glossy glaze that highlights the juicy berries.
- Prep Time: 30 minutes active hands-on time
- Cook Time: 1 hour
- Total Time: 1 hour 30 minutes
- Yield: 8 servings 1x
- Category: Dessert
- Cuisine: American
Ingredients
- 1 1/4 cups all-purpose flour (150g)
- 1/2 cup unsalted butter, chilled and cubed (113g)
- 1 tablespoon granulated sugar (12g)
- 3–4 tablespoons cold water (45-60ml)
- 1/4 teaspoon salt
- 4 cups fresh strawberries, hulled and sliced (600g)
- 1/2 cup granulated sugar (100g)
- 1 tablespoon lemon juice (15ml)
- 3 tablespoons cornstarch (24g)
- 1/4 cup strawberry jam (80g)
- 2 tablespoons water (30ml)
- 1 teaspoon lemon juice (5ml)
Instructions
- Make the crust dough: In a large bowl, whisk together the flour, sugar, and salt. Add the cold, cubed butter. Using a pastry cutter or your fingertips, work the butter into the flour until the mixture resembles coarse crumbs with pea-sized pieces. Add cold water one tablespoon at a time, mixing gently until the dough just comes together. Don’t overwork it—lumps of butter are good! Form the dough into a disk, wrap it in plastic, and chill in the fridge for at least 30 minutes (or up to 2 days).
- Prepare the filling: In a medium bowl, toss the sliced strawberries with sugar, lemon juice, and cornstarch. Set aside to macerate while you roll out the crust.
- Preheat the oven to 375°F (190°C). On a lightly floured surface, roll out the chilled dough into a 12-inch circle, about 1/8-inch thick. Transfer it carefully to your pie dish, pressing it into the edges without stretching. Trim excess dough, leaving about 1/2 inch overhang. Fold the edges under and crimp as you like.
- Bake the crust blind: Line the crust with parchment paper and fill with pie weights or dried beans. Bake for 15 minutes, then remove weights and parchment and bake an additional 5 minutes until the crust is just starting to turn golden.
- Fill and bake the pie: Spoon the strawberry filling into the warm crust, spreading evenly. Bake at 375°F (190°C) for 35-40 minutes, until the filling is bubbly and the crust is golden brown. Cover edges with foil if they brown too fast.
- Make the glaze: While the pie bakes, combine the strawberry jam, water, and lemon juice in a small saucepan. Warm over low heat, stirring until smooth and pourable. Remove from heat and let cool slightly.
- Glaze the pie: As soon as the pie comes out of the oven, brush the glaze gently over the berries to give that irresistible shine. Let the pie cool completely on a wire rack before slicing.
Notes
Blind bake the crust to prevent sogginess. Use ripe but firm strawberries to avoid mushy filling. Brush glaze while pie is warm for best shine. Cover crust edges with foil if browning too fast. Let pie cool fully before slicing to allow filling to set. Chill butter and water for flaky crust. If glaze thickens too much, warm gently with a splash of water. If crust cracks while rolling, chill dough for 10 minutes before retrying.
Nutrition
- Serving Size: 1 slice (1/8 of pie)
- Calories: 280
- Sugar: 22
- Sodium: 160
- Fat: 12
- Saturated Fat: 7
- Carbohydrates: 38
- Fiber: 3
- Protein: 3
Keywords: strawberry pie, fresh strawberry pie, homemade pie crust, fruit pie, summer dessert, easy glaze, berry pie


