My niece showed up at my door the Saturday before Halloween, dressed as a black cat (complete with whiskers drawn on with eyeliner), and announced she wanted to bake something “spooky but cute.” The problem? My pantry was a disaster zone. Half a bag of flour, some butter I’d meant to soften for dinner, and a lone bar of dark chocolate that had been sitting there since August. No cake mix. No cookie dough. No plan.
So I did what any slightly panicked aunt would do — I started throwing things together, hoping for the best. I figured a cookie cake was forgiving enough to handle my improvisation, and if I shaped it right, maybe I could make it look like a cat. A black cat, obviously. Because that’s what she wanted. (And honestly, the kid was committed to the costume, so I had to match her energy.)
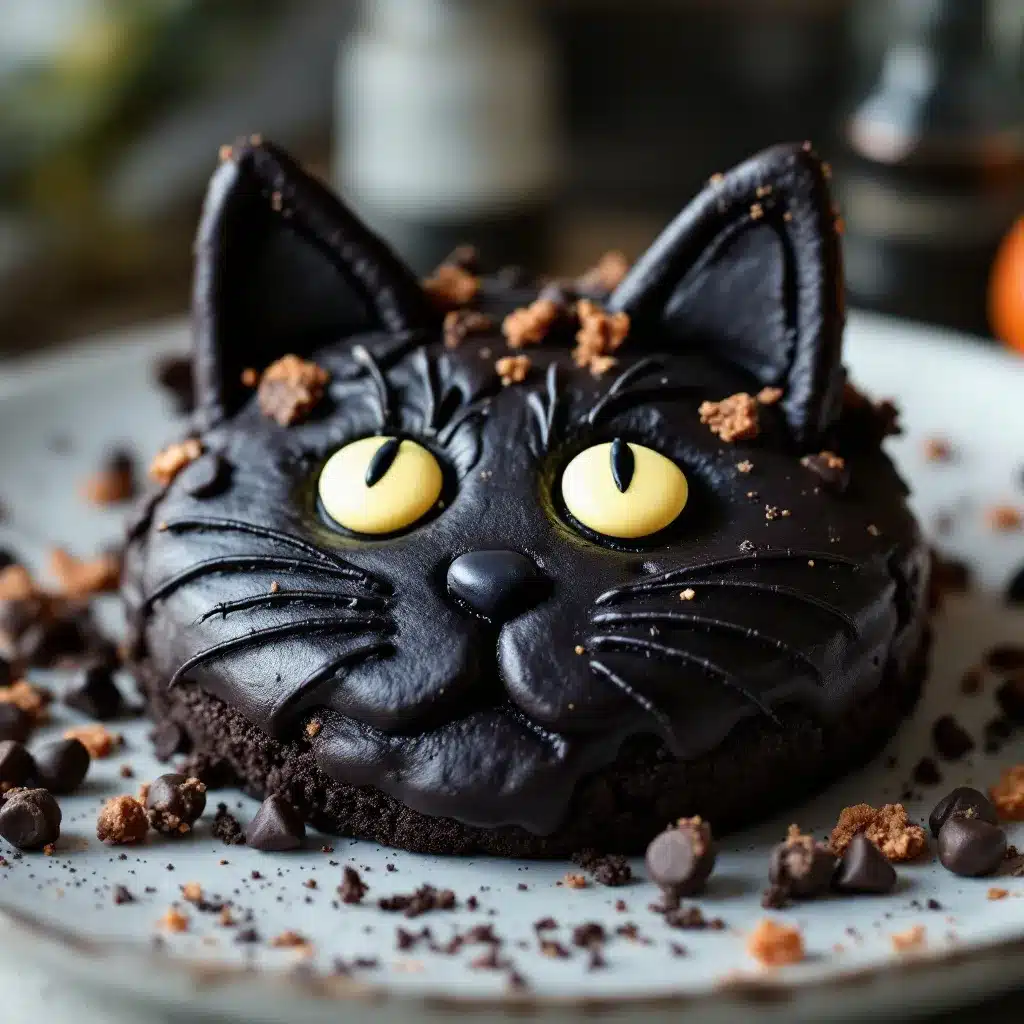
That first version was a little lopsided — one ear was bigger than the other, and the chocolate drizzle looked more like a Jackson Pollock painting than a cat face. But she loved it. She named it “Midnight” and insisted we make it again the next weekend, only “better.” So we did. We tweaked the dough, figured out the perfect ear shape, and discovered that melted chocolate chips make the best cat whiskers. This Adorable Black Cat Halloween Cookie Cake is the result of that messy, wonderful afternoon.
It’s the kind of recipe that feels like a happy accident — even though I’ve made it a dozen times since, it still tastes like that first imperfect version. And honestly? That’s exactly what Halloween baking should be.
Why You’ll Love This Recipe
Let me tell you — this isn’t just another Halloween dessert. This Black Cat Halloween Cookie Cake has become my most-requested recipe every October, and once you make it, you’ll understand why.
- Super Simple Ingredients : You probably have everything in your pantry right now. No fancy extracts, no hard-to-find decorations. Just basic baking staples that come together like magic.
- Comes Together in Under an Hour : From start to finish, you’re looking at about 45 minutes. Perfect for those “I need a Halloween treat NOW” moments (we’ve all been there).
- Customizable Without Stress : Want a white cat? Use white chocolate. Prefer a ghost? Just skip the ears. This recipe is forgiving enough for last-minute changes.
- Kid-Approved & Adult-Friendly : My niece devours it, and so do my grown-up friends at Halloween parties. It’s not too sweet, with that perfect chewy cookie texture.
- Looks Impressive, But Isn’t Hard : People will think you spent hours on this. You didn’t. That’s our little secret.
What makes this recipe different from every other Halloween cookie cake out there? It’s the texture. I spent weeks testing different butter-to-flour ratios until I got that perfect balance — crispy edges, soft center, and a cookie that holds its shape without spreading into a blob. Plus, the chocolate drizzle technique I’m going to show you? Game changer. No fancy piping bags needed, just a spoon and a steady hand.
This is the kind of dessert that makes people close their eyes after the first bite. It’s Halloween comfort food — playful, nostalgic, and just a little bit magical.
What Ingredients You Will Need
This recipe uses simple, pantry-friendly ingredients to create something that looks way more complicated than it actually is. Here’s what you’ll need:
For the Cookie Base
- 1 cup (2 sticks) unsalted butter, softened (I use Kerrygold for the best flavor, but any good butter works)
- 1 cup granulated sugar (adds that perfect crispy edge)
- ½ cup packed light brown sugar (for moisture and that chewy texture)
- 2 large eggs, room temperature (cold eggs will seize the butter)
- 2 teaspoons vanilla extract (pure, not imitation — trust me on this)
- 2 ½ cups all-purpose flour (spooned and leveled, don’t scoop directly)
- 1 teaspoon baking soda
- ½ teaspoon salt (I prefer fine sea salt for baking)
- 3 tablespoons black cocoa powder (this gives that deep black color without artificial dye — I recommend Rodelle brand)
For the Decoration
- ½ cup semi-sweet chocolate chips, melted (for the cat face details)
- ¼ cup white chocolate chips, melted (for eyes — optional but so cute)
- Orange or green candy eyes (the kind you find at craft stores around Halloween)
- Black licorice strings (for whiskers, or just pipe them with melted chocolate)
Ingredient Notes & Substitutions: If you can’t find black cocoa powder, you can use regular unsweetened cocoa powder plus a few drops of black food coloring. Just know the color won’t be as deep. For a gluten-free version, swap the all-purpose flour with a 1:1 gluten-free baking blend — I’ve tested this with King Arthur’s and it works beautifully. And if you’re dairy-free, use plant-based butter sticks (not the spreadable kind in a tub) and dairy-free chocolate chips.
One thing I learned the hard way: don’t skip the salt. It balances the sweetness and makes the chocolate flavor pop. I once forgot it and the cookie cake tasted flat — like something was missing but I couldn’t figure out what. Now I always double-check before I start mixing.
Equipment Needed
You don’t need a professional bakery setup for this. Here’s what you’ll need:
- Large mixing bowl (I use a glass one so I can see if the butter is properly creamed)
- Electric hand mixer or stand mixer (you can do this by hand, but your arm will get a workout)
- 12-inch round pizza pan or baking sheet (a round baking stone works great too)
- Parchment paper (non-negotiable — prevents sticking and makes cleanup a breeze)
- Spatula (for spreading the dough evenly)
- Small offset spatula or butter knife (for shaping the cat ears)
- Piping bag or zip-top bag (for the melted chocolate details)
- Cooling rack
Budget-Friendly Tip: If you don’t have a pizza pan, use a regular baking sheet and shape the cookie cake into a circle by hand. It doesn’t have to be perfect — actually, a slightly imperfect shape makes it look more homemade and charming. And if you don’t have a piping bag, just snip the corner off a sandwich bag. Works like a charm.
Preparation Method
Alright, let’s make this Black Cat Halloween Cookie Cake. I’ve broken it down into simple steps so you don’t miss anything.
- Preheat your oven to 350°F (175°C). Line your pizza pan or baking sheet with parchment paper. Trust me, this makes removing the cookie cake so much easier later.
- Cream the butter and sugars. In your large mixing bowl, beat the softened butter, granulated sugar, and brown sugar together until light and fluffy — about 3-4 minutes with an electric mixer. You’ll know it’s ready when it looks pale and almost whipped. Don’t rush this step; proper creaming is what gives the cookie its structure.
- Add the eggs and vanilla. Beat in the eggs one at a time, making sure each is fully incorporated before adding the next. Then add the vanilla extract. The mixture might look a little curdled at this point — that’s totally normal, don’t panic.
- Mix the dry ingredients separately. In a separate bowl, whisk together the flour, baking soda, salt, and black cocoa powder. This ensures everything is evenly distributed before it goes into the wet mixture.
- Combine wet and dry ingredients. Gradually add the dry mixture to the wet mixture, mixing on low speed until just combined. You don’t want to overmix here — stop as soon as you don’t see any more flour streaks. Overmixing develops gluten and makes the cookie cake tough.
- Chill the dough (optional but recommended). If you have time, pop the dough in the fridge for 15-20 minutes. This helps prevent spreading and makes shaping easier. If you’re in a rush, you can skip it — the cookie will just be a little wider and thinner.
- Shape the cookie cake. Transfer the dough to your prepared pan. Using your hands or a spatula, press it into a circle about ½-inch thick. Don’t make it too thin in the center — it will spread as it bakes.
- Form the cat ears. Here’s the trick: pinch off two small pieces of dough (about the size of a golf ball each), roll them into triangles, and attach them to the top of the circle to form ears. Press gently to seal them to the main cookie. Make them slightly wider than you think you need — they’ll spread and round out during baking.
- Bake for 18-22 minutes. The edges should be golden brown and set, but the center will still look slightly soft. That’s exactly what you want — it will continue to cook as it cools. If you overbake it, the cookie will be hard instead of chewy.
- Cool completely on the pan. This is crucial. Let the cookie cake cool on the pan for at least 20 minutes before you try to move it or decorate it. If you rush this step, the cookie will crumble and the chocolate will slide right off.
Pro Tip: While the cookie is cooling, melt your chocolate chips. I do this in the microwave in 20-second intervals, stirring between each, until smooth. Don’t overheat or the chocolate will seize up and become grainy.
Cooking Tips & Techniques
After making this recipe more times than I can count (and messing it up plenty), here are the things I wish someone had told me:
The Black Cocoa Powder Situation. Black cocoa powder is different from regular cocoa — it’s more alkaline and less acidic, which means it doesn’t react with baking soda the same way. That’s why I add a little extra baking soda to help with leavening. If you use regular cocoa powder instead, reduce the baking soda to ½ teaspoon.
Don’t Overbake, Seriously. I know I’ve said this already, but I’m saying it again because it’s that important. The first time I made this, I left it in the oven an extra 3 minutes because I thought it looked “too soft.” It came out like a hockey puck. A black hockey puck. Not cute. Take it out when the edges are set and the center still jiggles slightly when you shake the pan.
Shaping the Ears. This was my biggest struggle. The ears kept melting into the cookie during baking and looking like weird lumps. The solution? Make them thicker and attach them firmly to the main dough. Also, chill the shaped cookie for 10 minutes before baking — it helps the ears hold their shape.
Chocolate Drizzle Technique. Don’t try to pipe the chocolate while it’s hot. Let it cool slightly until it’s thick but still pourable — about the consistency of warm honey. Then spoon it into your piping bag and go slowly. If you mess up, don’t stress. You can scrape it off and try again while the chocolate is still wet.
Timing Strategy. Here’s how I multitask: While the dough chills, I melt the chocolate and set up my decorating station. While the cookie bakes, I clean up the kitchen. That way, when it’s time to decorate, everything is ready and I’m not running around with chocolate-covered hands.
Variations & Adaptations
One of the best things about this Black Cat Halloween Cookie Cake is how easy it is to change it up. Here are some variations I’ve tried:
- White Cat Version: Skip the black cocoa powder and use white chocolate chips in the dough. Decorate with dark chocolate details for a striking contrast. My niece calls this one “Snowball.”
- Pumpkin Spice Cat: Add 1 teaspoon pumpkin pie spice and ½ cup pumpkin puree to the dough. Reduce the butter to ¾ cup and increase the flour to 3 cups to compensate for the extra moisture. This version is perfect for Thanksgiving too.
- Gluten-Free Adaptation: Use a 1:1 gluten-free baking flour blend. I’ve tested this with Bob’s Red Mill and it works perfectly. Just note that the texture will be slightly more tender and less chewy.
- Vegan Option: Substitute the butter with vegan butter sticks, use flax eggs (1 tablespoon ground flaxseed + 3 tablespoons water per egg), and choose dairy-free chocolate chips. The texture will be a bit more cake-like but still delicious.
- Cookie Sandwich Twist: Make two smaller cookie cakes and sandwich them with vanilla buttercream or chocolate ganache. It’s extra indulgent and perfect for birthday parties.
I once made a “zombie cat” version for a Halloween party — I added green food coloring to the dough, used white chocolate for the eyes, and piped on a crooked mouth. It was hilariously ugly and everyone loved it. Don’t be afraid to get weird with it.
Serving & Storage Suggestions
This cookie cake is best served at room temperature — the texture is perfectly chewy and the chocolate decorations stay firm but not hard. If you’ve refrigerated it, let it sit out for about 15 minutes before serving.
How to Serve: Slice it like a pizza into wedges. Each slice should have a bit of ear, a bit of face, and plenty of chocolate detail. For extra fun, serve it with a scoop of vanilla ice cream or a glass of cold milk. If you’re serving it at a Halloween party, arrange it on a black cake stand for maximum spooky vibes.
Pairing Suggestions: This cookie cake pairs beautifully with a warm cup of spiced cider or a refreshing champagne punch for an adults-only celebration. For a cozy night in, try it alongside a creamy New Year’s cheesecake for a dessert spread that covers all the bases. And if you’re hosting a Halloween party, these elegant caviar deviled eggs make a surprisingly perfect savory starter before the sweet stuff.
Storage: Store any leftovers in an airtight container at room temperature for up to 3 days. If you stack slices, place a piece of parchment paper between them to prevent the chocolate from smudging. You can also freeze the undecorated cookie cake for up to 2 months — just wrap it tightly in plastic wrap and then foil. Thaw at room temperature, then decorate fresh.
Flavor Development: Honestly, this cookie cake tastes even better the next day. The flavors meld together overnight, and the texture becomes even more fudgy and delicious. So don’t stress about making it a day ahead — it’s actually better that way.
Nutritional Information & Benefits
Let’s be real — this is a treat, not a health food. But here’s the breakdown per serving (assuming 8 slices):
- Calories: Approximately 420 per slice
- Fat: 22g
- Carbohydrates: 54g
- Protein: 5g
- Sugar: 32g
- Fiber: 2g
Health Highlights: Black cocoa powder actually contains more antioxidants than regular cocoa powder because it’s less processed. It also has a lower sugar content naturally. The butter provides vitamin A, and the eggs add protein and healthy fats. Is it a superfood? No. But it’s not the worst thing you could eat either.
Allergen Considerations: This recipe contains wheat, dairy, and eggs. For nut-free preparation, ensure your chocolate chips are processed in a nut-free facility. The gluten-free and vegan variations mentioned above address common dietary restrictions.
My Take: I believe in balance. This cookie cake is meant to be enjoyed on special occasions — Halloween, birthdays, or just because it’s Tuesday and you need something cute. One slice won’t derail your health goals, and the joy it brings is absolutely worth it. Life’s too short for boring desserts.
Conclusion
This Adorable Black Cat Halloween Cookie Cake is more than just a dessert — it’s a memory waiting to happen. Whether you’re making it with your kids, bringing it to a Halloween party, or just treating yourself to something fun, it delivers every single time. It’s forgiving enough for beginners, impressive enough for experienced bakers, and customizable enough to make it your own.
I still think about that first lopsided version I made with my niece. It wasn’t perfect, but it was ours. And that’s the thing about baking — the imperfections are what make it special. So don’t stress about getting the ears exactly right or the chocolate drizzle perfectly straight. Your black cat will be adorable no matter what, because you made it with love.
I’d love to see your version! Tag me when you make it, leave a comment below with your twist, or share your spooky creation with friends. And if you come up with a variation I haven’t tried — like a vampire bat or a ghost — definitely let me know. Happy Halloween, and happy baking!
Frequently Asked Questions
Can I make this cookie cake ahead of time?
Absolutely! You can bake the cookie cake up to 2 days in advance and store it undecorated at room temperature. Decorate it the day you plan to serve it for the best presentation. You can also freeze the baked cookie for up to 2 months.
Why did my cookie cake spread too much?
This usually happens for one of three reasons: the dough wasn’t chilled, the butter was too soft, or the pan was too warm. Next time, chill the shaped dough for 15-20 minutes before baking, and make sure your butter is softened but not melted.
Can I use a different shape instead of a cat?
Definitely! This dough works for any shape — ghosts, pumpkins, bats, or even a simple round cookie cake. Just adjust the baking time if the shape is much thinner or thicker than the original.
How do I get the black color without black cocoa powder?
If you can’t find black cocoa powder, use regular unsweetened cocoa powder plus a few drops of black gel food coloring. Liquid food coloring won’t work as well and might affect the texture. Start with 2-3 drops and add more until you reach the desired color.
My chocolate drizzle looks messy. How do I fix it?
Don’t worry — messy drizzles can look charming! If you want cleaner lines, let the chocolate cool until it’s thick but still pourable, and use a piping bag with a small round tip. If you mess up, you can scrape the chocolate off while it’s still wet and try again.
Pin This Recipe!

Easy Homemade Black Cat Halloween Cookie Cake Recipe

This Adorable Black Cat Halloween Cookie Cake is a spooky but cute dessert that comes together in under an hour. With a perfectly chewy texture, crispy edges, and a rich black cocoa flavor, it’s a forgiving recipe that looks impressive but is easy enough for beginners.
- Prep Time: 15 minutes
- Cook Time: 20 minutes
- Total Time: 45 minutes
- Yield: 8 servings 1x
- Category: Dessert
- Cuisine: American
Ingredients
- 1 cup (2 sticks) unsalted butter, softened
- 1 cup granulated sugar
- ½ cup packed light brown sugar
- 2 large eggs, room temperature
- 2 teaspoons vanilla extract
- 2 ½ cups all-purpose flour, spooned and leveled
- 1 teaspoon baking soda
- ½ teaspoon fine sea salt
- 3 tablespoons black cocoa powder
- ½ cup semi-sweet chocolate chips, melted
- ¼ cup white chocolate chips, melted (optional)
- Orange or green candy eyes (optional)
- Black licorice strings (optional)
Instructions
- Preheat your oven to 350°F (175°C). Line a 12-inch round pizza pan or baking sheet with parchment paper.
- In a large mixing bowl, beat the softened butter, granulated sugar, and brown sugar together until light and fluffy, about 3-4 minutes with an electric mixer.
- Beat in the eggs one at a time, ensuring each is fully incorporated before adding the next. Add the vanilla extract and mix until combined.
- In a separate bowl, whisk together the flour, baking soda, salt, and black cocoa powder.
- Gradually add the dry mixture to the wet mixture, mixing on low speed until just combined. Do not overmix.
- Chill the dough in the refrigerator for 15-20 minutes (optional but recommended).
- Transfer the dough to the prepared pan. Using your hands or a spatula, press it into a circle about ½-inch thick.
- Pinch off two small pieces of dough (about the size of a golf ball each), roll them into triangles, and attach them to the top of the circle to form cat ears. Press gently to seal.
- Bake for 18-22 minutes, until the edges are golden brown and set but the center still looks slightly soft.
- Cool completely on the pan for at least 20 minutes before decorating.
- While the cookie cools, melt the semi-sweet chocolate chips in the microwave in 20-second intervals, stirring between each, until smooth. Repeat with white chocolate chips if using.
- Decorate the cooled cookie cake with melted chocolate to create cat face details (eyes, nose, whiskers). Add candy eyes or licorice whiskers if desired.
Notes
For best results, chill the shaped dough for 10 minutes before baking to help the ears hold their shape. Don’t overbake; the center should still jiggle slightly when you shake the pan. The cookie tastes even better the next day as flavors meld. For a deeper black color, use black cocoa powder; if unavailable, use regular unsweetened cocoa powder plus a few drops of black gel food coloring.
Nutrition
- Serving Size: 1 slice (1/8 of cook
- Calories: 420
- Sugar: 32
- Sodium: 280
- Fat: 22
- Saturated Fat: 13
- Carbohydrates: 54
- Fiber: 2
- Protein: 5
Keywords: Halloween cookie cake, black cat cookie, Halloween dessert, chocolate cookie cake, easy Halloween recipe, spooky treats, cookie cake recipe


