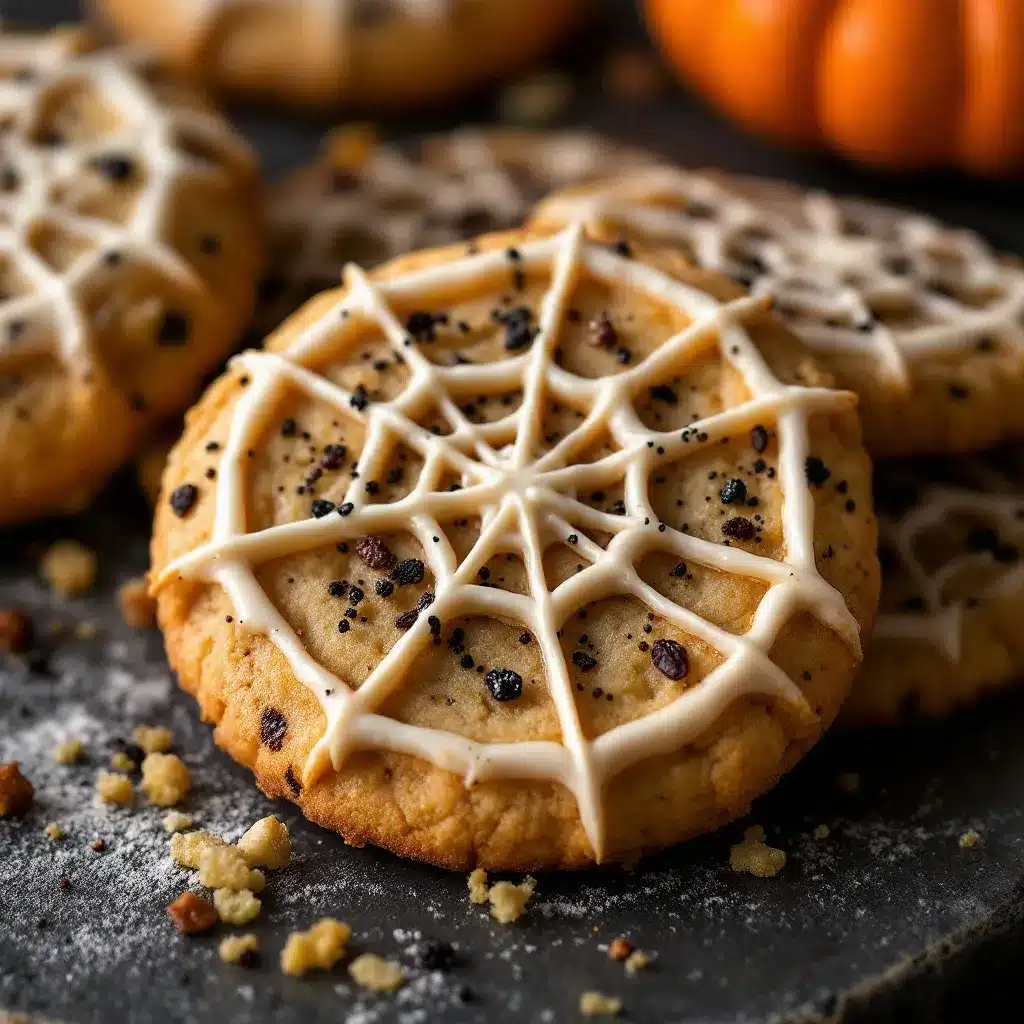
My niece, a notoriously picky eight-year-old, looked at the cookie platter at our family Halloween party and said, “Wait, can we make these at my house?” That never happens. She usually just eats the frosting off things and walks away. But she stood there, pointing at the spiderweb cookies, and asked again. I told her the truth—they were just sugar cookies with a little icing trick, nothing fancy. And honestly, that moment made me realize this recipe was something special. It wasn’t about being impressive. It was about being doable.
These Easy Spiderweb Halloween Sugar Cookies started as a last-minute idea when I needed something for a school bake sale and didn’t have time for anything complicated. I remember standing in my kitchen, staring at a batch of plain sugar cookies, thinking they needed something. A toothpick, some icing, and one weird swirling motion later—boom. A spiderweb appeared. My kid looked over my shoulder and said, “Whoa, how did you do that?” I honestly couldn’t explain it at first. It just worked.
The best part? They actually look cool. Not in a “oh, that’s cute” way. In a “wait, you made those?” way. And the secret is, you barely did anything. That’s the kind of recipe I love. One that makes you look like you tried way harder than you actually did. So if you have kids who want to help, or a party to prep for, or you just want something festive without the stress, these cookies are your answer. They’re simple, they’re fun, and they actually taste good—not just look good.
Why You’ll Love This Recipe
Let’s be real for a second. Halloween recipes can be a total pain. Between the fondant, the food coloring stains on your counter, and the three-hour decorating sessions, it’s easy to feel like you need a culinary degree just to make something spooky. That’s not what these cookies are about. These are the kind of cookies you can make while your kids are fighting over a costume in the next room, and you still end up looking like a hero.
- Quick & Easy : From start to finish, you’re looking at about 30 minutes of active time. The dough comes together fast, and the decorating takes maybe 10 minutes total. Perfect for busy weeknights when you suddenly remember the school party is tomorrow.
- Simple Ingredients : You probably already have everything in your pantry. Butter, sugar, flour, eggs, vanilla, and some powdered sugar for the icing. No specialty stores needed. No hunting down black gel food coloring at the last minute.
- Perfect for Halloween Parties : Whether it’s a classroom celebration, a neighborhood gathering, or just a spooky movie night at home, these cookies fit right in. They’re festive without being over-the-top.
- Crowd-Pleaser : Kids love them because they look cool. Adults love them because they taste like real sugar cookies, not cardboard with frosting. Everyone wins.
- Unbelievably Delicious : The cookie base is soft, buttery, and slightly crisp on the edges. The icing adds just the right amount of sweetness. It’s comfort food with a Halloween twist.
What makes these different from every other spiderweb cookie out there? It’s the technique. Most recipes have you draw concentric circles with icing, then drag a toothpick through them. That works, but it can get messy. My version uses a slightly thicker icing that holds its shape better, so your webs look clean and defined. Plus, I add a tiny pinch of salt to the icing to balance the sweetness—something I learned after making a batch that was way too sugary and gave everyone a headache. Trust me on that one.
This is the kind of recipe that makes you close your eyes after the first bite. It’s simple, it’s satisfying, and it’s exactly what you need when you want to make something special without losing your mind.
What Ingredients You Will Need
This recipe uses basic baking staples to create something that feels way more impressive than it actually is. Here’s what you’ll need, broken down by component so you can see exactly what goes where.
For the Sugar Cookie Dough
- 2 ¾ cups (345g) all-purpose flour – Spoon and level it. Don’t scoop directly from the bag or you’ll end up with dry cookies. I use Gold Medal, but any brand works fine.
- 1 cup (226g) unsalted butter, softened – Let it sit out for about 30 minutes. It should be soft enough to leave an indent when you press it, but not melty. If you’re in a rush, cut it into small cubes and let it sit for 15 minutes.
- 1 cup (200g) granulated sugar – Regular white sugar works best here. Brown sugar would change the texture and make them chewier, which isn’t what we want.
- 1 large egg, room temperature – Cold eggs can make the dough seize up. If you forgot to take it out, place it in a bowl of warm water for 5 minutes.
- 1 teaspoon vanilla extract – Pure vanilla extract gives the best flavor, but imitation works in a pinch. I’ve used both and honestly, the difference is subtle in this recipe.
- ½ teaspoon baking powder – Make sure it’s not expired. Old baking powder won’t give you the lift you need.
- ¼ teaspoon salt – Just a pinch to balance the sweetness. I use fine sea salt.
For the Spiderweb Icing
- 1 ½ cups (180g) powdered sugar – Sift it if you have clumps. Nobody wants lumpy icing.
- 2-3 tablespoons milk or heavy cream – Heavy cream gives a richer texture, but milk works fine. Start with 2 tablespoons and add more if needed.
- ½ teaspoon vanilla extract – Adds flavor depth. You could also use almond extract for a different twist.
- Black gel food coloring – Gel is key here. Liquid food coloring will thin out your icing and make it runny. I use AmeriColor brand, but Wilton works too.
- White icing (optional) – If you want a white base to draw the webs on, you’ll need a separate batch of white icing. I usually just use the same icing and add the black coloring to half of it.
Ingredient Selection Tips
For the butter, I really recommend using unsalted so you can control the salt level. If you only have salted butter, just skip the added salt in the dough. For the food coloring, don’t cheap out. I tried using a generic brand once and ended up with gray, watery icing that looked like a sad raincloud. Gel coloring is worth the extra dollar. And for the vanilla, I know pure vanilla is expensive, but it really does make a difference in a simple cookie like this. If you’re on a budget, use half pure and half imitation—it’s a good compromise.
If you’re making these gluten-free, swap the all-purpose flour for a 1:1 gluten-free baking flour. I’ve had good luck with King Arthur’s Measure for Measure blend. Just know the texture will be slightly more tender, so handle the dough gently.
Equipment Needed
You don’t need a professional bakery setup for these cookies. Here’s what I use and what you can substitute if you’re working with a limited kitchen.
- Stand mixer or hand mixer : A stand mixer makes creaming the butter and sugar effortless, but a hand mixer works just as well. You could even do it by hand with a wooden spoon if you’re feeling nostalgic—it just takes more elbow grease.
- Baking sheets : I use light-colored aluminum baking sheets. Dark sheets can cause the bottoms to brown too quickly. If that’s all you have, reduce the baking time by a minute or two.
- Parchment paper or silicone baking mats : Parchment paper is cheap and disposable. Silicone mats are reusable and give even baking. Either works. I prefer parchment for easy cleanup.
- Round cookie cutter : You want a 2.5 to 3-inch round cutter for the classic cookie shape. No fancy shapes needed. If you don’t have a round cutter, use the rim of a drinking glass—just dip it in flour first so it doesn’t stick.
- Piping bag or zip-top bag : For the icing. A piping bag with a small round tip (like Wilton #2 or #3) gives you more control, but a zip-top bag with the corner snipped off works perfectly fine. I’ve done it both ways.
- Toothpick : This is the magic tool for creating the spiderweb design. Just one toothpick. That’s it.
- Cooling rack : Essential for letting cookies cool completely before icing. If you ice warm cookies, the icing will melt into a puddle.
I got my first set of piping tips from a dollar store kit, and they lasted me years. You don’t need expensive equipment. Just clean, functional tools that do the job.
Preparation Method
Okay, let’s get into the actual process. I’ll walk you through every step, including the little things I’ve learned from making these cookies more times than I can count.
Step 1: Make the Cookie Dough
In a large bowl, cream together the softened butter and granulated sugar until light and fluffy. This takes about 3-4 minutes with an electric mixer on medium speed. You’re looking for a pale, creamy texture. Scrape down the sides of the bowl halfway through. Add the egg and vanilla extract, then beat until combined. It might look a little curdled at this point—that’s normal. Don’t panic.
In a separate bowl, whisk together the flour, baking powder, and salt. Gradually add the dry ingredients to the wet mixture, mixing on low speed until just combined. The dough will be soft and slightly sticky, but it should hold together when pressed. If it feels too sticky to handle, add a tablespoon more flour. If it’s crumbly, add a teaspoon of milk.
Divide the dough into two discs, wrap each in plastic wrap, and refrigerate for at least 30 minutes. This step is non-negotiable. Chilled dough is easier to roll, cuts cleanly, and holds its shape better in the oven. I once skipped this step and ended up with cookies that spread into weird oval blobs. Not cute.
Step 2: Roll and Cut the Cookies
Preheat your oven to 350°F (175°C). Line your baking sheets with parchment paper. Take one disc of dough out of the fridge and let it sit at room temperature for 5 minutes—just enough to soften slightly without getting warm. On a lightly floured surface, roll the dough to about ¼-inch thickness. I use a rolling pin with adjustable rings, but you can eyeball it. Just make sure it’s even.
Cut out rounds with your cookie cutter and place them about 2 inches apart on the prepared baking sheets. Gather the scraps, re-roll them, and cut more cookies. You should get about 24 cookies from this batch, depending on the size of your cutter.
Step 3: Bake the Cookies
Bake for 8-10 minutes, or until the edges are just barely golden. The centers should look set but not browned. Every oven runs differently, so start checking at 8 minutes. I like to rotate the baking sheet halfway through for even baking. Let the cookies cool on the baking sheet for 5 minutes, then transfer them to a cooling rack to cool completely. Do not ice them while they’re warm. I learned this the hard way when my first batch of webs turned into sad, runny puddles.
Step 4: Make the Icing
In a small bowl, whisk together the powdered sugar, 2 tablespoons of milk or cream, and vanilla extract. You want a thick but pourable consistency—think honey, not water. If it’s too thick, add a tiny splash more milk. If it’s too thin, add a little more powdered sugar. Divide the icing into two bowls. Color one bowl with black gel food coloring until you get a deep, dark black. Leave the other bowl white.
Transfer each color to separate piping bags or zip-top bags. Snip a very small tip off the corner of each bag. You want a thin line, not a gusher. If you cut too much, just squeeze a little out to test the flow before you start decorating.
Step 5: Decorate the Cookies
This is where the magic happens. Start by piping a thin outline of white icing around the edge of each cookie. Then fill in the center with more white icing, spreading it gently with a toothpick or the back of a spoon if needed. Let this base layer set for about 5 minutes—it should be slightly firm but not completely dry.
Now, pipe a small dot of black icing in the very center of the cookie. Pipe concentric circles around it, spacing them about ¼ inch apart. You don’t need to be perfect here. Imperfect circles actually look more organic and web-like. Take a toothpick and drag it from the center dot outward through all the circles, like you’re drawing spokes on a wheel. Wipe the toothpick clean, then drag another line from the center to the edge, slightly offset from the first. Repeat until you’ve gone all the way around the cookie. You should have 6-8 spokes total.
The toothpick drags the black icing through the white, creating the classic spiderweb pattern. It’s honestly mesmerizing to watch. My kids fight over who gets to do this step.
Step 6: Let the Icing Set
Let the decorated cookies sit at room temperature for about 1-2 hours until the icing is completely set. If you’re in a hurry, you can pop them in the fridge for 30 minutes, but make sure they’re on a flat surface so the icing doesn’t slide. Once set, they’re ready to serve or store.
Cooking Tips & Techniques
I’ve made these cookies probably a dozen times now, and I’ve messed up enough to know what works and what doesn’t. Here are the things I wish someone had told me.
Chill the dough thoroughly. I cannot stress this enough. Warm dough spreads. Spread dough makes flat, sad cookies that don’t have enough surface area for the web design. If your kitchen is warm, pop the cut-out cookies in the fridge for 10 minutes before baking. It makes a huge difference.
Don’t overwork the dough. When you’re re-rolling the scraps, handle them as little as possible. Overworking develops the gluten and makes the cookies tough. I usually roll the scraps once, maybe twice, then toss the rest. A few extra cookies aren’t worth the tough texture.
Use gel food coloring. I already mentioned this, but it’s worth repeating. Liquid food coloring will ruin your icing. It thins it out, makes it runny, and you’ll end up with a mess. Gel coloring gives you vibrant color without changing the consistency. Plus, a little goes a long way. I’ve had the same bottle of black gel for two years.
Test your icing consistency. Before you start decorating, squeeze a tiny bit of icing onto a plate. It should hold its shape but spread slightly when you press it with a finger. If it runs everywhere, add more powdered sugar. If it won’t squeeze out, add a drop of milk. Getting this right is the difference between clean webs and a muddy mess.
Work in batches. Don’t try to ice all 24 cookies at once. Ice 4-5 cookies, do the spiderweb design, then move on. If you ice all of them first and then try to do the webs, the base layer will be too set and the toothpick won’t drag cleanly. Trust me on this one.
One time, I was in a rush and used warm cookies. The icing melted instantly and turned into a grayish puddle. I tried to salvage it by adding more icing, but it just made things worse. I ended up scraping the whole batch and starting over. Learn from my mistakes.
Variations & Adaptations
These cookies are pretty flexible. Here are some ways to change them up depending on what you have or who you’re serving.
Gluten-Free Version : Swap the all-purpose flour for a 1:1 gluten-free baking blend. I’ve used Bob’s Red Mill and King Arthur’s Measure for Measure with good results. The dough will be a little more delicate, so handle it gently and chill it well before rolling. The taste is almost identical—I’ve served these to gluten-eating friends who didn’t notice a thing.
Vegan Option : Use vegan butter (I like Miyoko’s) and a flax egg (1 tablespoon ground flaxseed mixed with 3 tablespoons water, let sit for 5 minutes). For the icing, use plant-based milk like oat or almond. The texture will be slightly different—the cookies will be a bit more crumbly—but the flavor is still great.
Chocolate Base : If you want a darker, more dramatic look, replace ¼ cup of the flour with unsweetened cocoa powder. The cookies will be chocolate-flavored, and the white spiderweb will pop against the dark background. Just be careful not to overbake them—chocolate cookies can go from done to burnt in seconds.
Different Colors : Who says spiderwebs have to be black? Try purple and orange for a fun twist, or green and white for a more Halloween-y vibe. I made a batch with neon green webs for a glow-in-the-dark party, and they were a hit. Just use the same technique with different gel colors.
Add Sprinkles : Before the icing sets, sprinkle some orange or black jimmies on top. Or add edible glitter for a little sparkle. My niece loves the ones with sprinkles, even though I think they look a little messy. But hey, it’s Halloween. Messy works.
Serving & Storage Suggestions
These cookies are best served at room temperature. The icing should be fully set and firm to the touch, not sticky. I like to arrange them on a platter with some candy corn or mini pumpkins for a festive look. If you’re serving them at a party, place them on a cake stand so they’re at eye level. People love seeing the spiderweb design up close.
For storage, keep them in an airtight container at room temperature. Layer them between sheets of parchment paper so the icing doesn’t stick together. They’ll stay fresh for up to 5 days, though honestly, they’re usually gone by day 2. If you live in a humid climate, add a silica gel packet to the container to keep the cookies from getting soft.
Freezing Instructions : You can freeze the baked, undecorated cookies for up to 3 months. Just let them cool completely, then place them in a freezer-safe bag with parchment between layers. When you’re ready to decorate, thaw them at room temperature for about 30 minutes, then ice as directed. I do this all the time when I want to prep ahead for Halloween parties. It saves so much stress on the day of.
To freeze decorated cookies, let the icing set completely first, then freeze in a single layer on a baking sheet. Once frozen, transfer to a freezer bag. Thaw in the fridge overnight or at room temperature for an hour. The icing might get a little condensation, but it’ll dry off quickly.
The flavors actually develop a bit over time. Day-old cookies taste slightly more buttery and the icing gets a little firmer. So if you can make them a day ahead, even better.
Nutritional Information & Benefits
Let’s be honest—these are cookies. They’re not health food. But they’re made with real ingredients, and that counts for something. Here’s the approximate nutritional breakdown per cookie (based on 24 cookies):
| Nutrient | Amount |
|---|---|
| Calories | 145 |
| Total Fat | 7g |
| Saturated Fat | 4g |
| Cholesterol | 25mg |
| Sodium | 55mg |
| Total Carbohydrates | 20g |
| Sugars | 12g |
| Protein | 2g |
The butter provides a small amount of vitamin A, and the egg adds a bit of protein. If you use whole wheat pastry flour instead of all-purpose, you’ll get a little more fiber, though the texture will be slightly denser. For a lower-sugar option, you can reduce the sugar in the dough to ¾ cup, but the cookies won’t be as tender.
These cookies are vegetarian-friendly. If you need them to be dairy-free, use vegan butter and plant-based milk for the icing. They’re not suitable for nut-free environments unless you verify all your ingredients are nut-free—some brands of vanilla extract are processed with nuts.
I personally think it’s fine to enjoy a cookie or two as part of a balanced diet. Halloween only comes once a year, after all. Life’s too short to skip the spiderwebs.
FAQs
Can I use store-bought sugar cookie dough?
Yes, absolutely. If you’re short on time, grab a tube of refrigerated sugar cookie dough from the store. Just slice it, bake according to package directions, and then decorate with the spiderweb icing. The taste won’t be quite as good as homemade, but it’s a perfectly fine shortcut.
Why did my spiderweb design turn into a blob?
This usually happens for one of two reasons. Either your base icing was too wet, or you dragged the toothpick too fast. Make sure your icing is thick enough to hold its shape, and drag the toothpick slowly and deliberately. If the base icing is still too runny, let it set for a few more minutes before adding the black circles.
Can I make these cookies ahead of time?
Yes! You can make the dough up to 3 days ahead and keep it in the fridge. Or bake the cookies and freeze them undecorated for up to 3 months. I usually bake and decorate them the day before I need them, then store them in an airtight container overnight.
How do I get the black icing really dark?
Use gel food coloring and add it gradually. Start with a tiny drop, mix it in, and add more until you reach the desired shade. If you’re going for true black, you might need quite a bit of gel. Let the icing sit for 10 minutes after adding the color—it often darkens as it sits.
Can I use royal icing instead of the glaze icing?
Definitely. Royal icing dries harder and gives a more matte finish. If you prefer that look, use a standard royal icing recipe (powdered sugar, meringue powder, and water) and thin it to the right consistency. The spiderweb technique works the same way. Just know that royal icing sets faster, so work quickly.
Conclusion
These Easy Spiderweb Halloween Sugar Cookies are the kind of recipe that makes you look like you put in way more effort than you actually did. They’re simple enough for a weeknight baking session with kids, but impressive enough to steal the show at any Halloween party. The best part? You don’t need fancy tools or artistic skills. Just a toothpick, some icing, and a little patience.
I love how forgiving this recipe is. If your circles aren’t perfect, that’s fine—spiderwebs aren’t supposed to be perfect. If your black icing isn’t completely black, it still looks cool. There’s no pressure here. Just fun, festive cookies that taste amazing and bring a little joy to the season.
I’d love to hear how yours turn out. Did you try a different color combination? Add sprinkles? Make them gluten-free? Drop a comment below and let me know. And if you’re looking for more easy party recipes, check out these crispy prosciutto-wrapped asparagus bites or this refreshing champagne punch for your next gathering. Happy Halloween, and happy baking!
Pin This Recipe!

Best Easy Spiderweb Halloween Sugar Cookies

These easy spiderweb Halloween sugar cookies are soft, buttery, and decorated with a simple icing trick that creates a stunning web design. Perfect for parties, bake sales, or a fun activity with kids.
- Prep Time: 30 minutes
- Cook Time: 10 minutes
- Total Time: 45 minutes
- Yield: 24 servings 1x
- Category: Dessert
- Cuisine: American
Ingredients
- 2 ¾ cups (345g) all-purpose flour
- 1 cup (226g) unsalted butter, softened
- 1 cup (200g) granulated sugar
- 1 large egg, room temperature
- 1 teaspoon vanilla extract
- ½ teaspoon baking powder
- ¼ teaspoon salt
- 1 ½ cups (180g) powdered sugar
- 2–3 tablespoons milk or heavy cream
- ½ teaspoon vanilla extract
- Black gel food coloring
- White icing (optional)
Instructions
- In a large bowl, cream together the softened butter and granulated sugar until light and fluffy, about 3-4 minutes. Add the egg and vanilla extract, then beat until combined.
- In a separate bowl, whisk together the flour, baking powder, and salt. Gradually add the dry ingredients to the wet mixture, mixing on low speed until just combined. The dough will be soft and slightly sticky.
- Divide the dough into two discs, wrap each in plastic wrap, and refrigerate for at least 30 minutes.
- Preheat oven to 350°F (175°C). Line baking sheets with parchment paper.
- On a lightly floured surface, roll one disc of dough to ¼-inch thickness. Cut out rounds with a 2.5 to 3-inch round cookie cutter and place 2 inches apart on prepared baking sheets. Gather scraps, re-roll, and cut more cookies.
- Bake for 8-10 minutes, until edges are just barely golden. Let cool on baking sheet for 5 minutes, then transfer to a cooling rack to cool completely.
- In a small bowl, whisk together powdered sugar, 2 tablespoons milk or cream, and vanilla extract until thick but pourable. Divide icing into two bowls. Color one bowl with black gel food coloring until deep black. Leave the other white.
- Transfer each color to separate piping bags or zip-top bags. Snip a very small tip off the corner of each bag.
- Pipe a thin outline of white icing around the edge of each cookie, then fill in the center. Let set for about 5 minutes.
- Pipe a small dot of black icing in the center of the cookie. Pipe concentric circles around it, spacing about ¼ inch apart.
- Take a toothpick and drag it from the center dot outward through all the circles, creating spokes. Wipe toothpick clean and repeat until you have 6-8 spokes total.
- Let decorated cookies sit at room temperature for 1-2 hours until icing is completely set.
Notes
Chill dough thoroughly to prevent spreading. Use gel food coloring for best results. Test icing consistency before decorating. Work in batches to ensure the base layer is not too set.
Nutrition
- Serving Size: 1 cookie
- Calories: 145
- Sugar: 12
- Sodium: 55
- Fat: 7
- Saturated Fat: 4
- Carbohydrates: 20
- Protein: 2
Keywords: Halloween cookies, sugar cookies, spiderweb cookies, easy Halloween dessert, decorated cookies